# RuYing Digital Human / RuYing Voice Cloning Collection Standards
For avatar collection, it is recommended to focus on Chapters 1, 5, 6, and 7.
# 1. Quick Digital Human / Standard Digital Human Collection Standards
# 1.1 Recording Environment & Equipment
# 1.1.1 Recording Environment Requirements
Quiet environment: No external sound interference during recording, including other people's voices, air conditioners, fans, and other electrical appliance sounds, as well as other noise or vibrations.
Clean recording background:
- No dynamic backgrounds (videos, animations, etc.)
- No reflective, transparent, or semi-transparent background materials
- No direct light sources in the recording background, such as windows or illuminated light bulbs
- Green screen recording is recommended (allows background replacement for digital human videos)
Configure appropriate lighting according to recording quality requirements; ensure overall uniform illumination with no obvious shadows in the background environment.
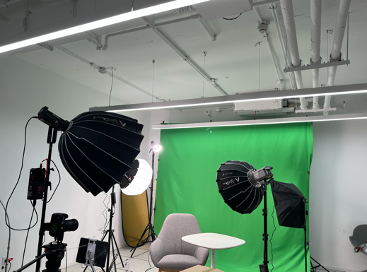
# 1.1.2 Recording Equipment Requirements
- Use a DSLR camera or camcorder capable of recording at 1080P or higher resolution (1080×1920 vertical portrait mode is recommended)
- Configure a microphone that can be connected to the DSLR camera (or camcorder); do not clip the microphone onto the model. It is recommended to place it as close to the model as possible but out of frame. Confirm that the captured audio is clear with no background noise before recording.
- A teleprompter is recommended (or use an iPad with a teleprompter app installed)
# 1.1.3 Model Makeup and Props Preparation
Clean the face before recording (men should trim their beards), and apply makeup as needed.
The overall makeup, clothing, and props should match the desired final digital human appearance, but the following situations should be avoided:
- Avoid overly loose hairstyles
- Avoid dangling earrings or other hanging accessories
- Avoid hairstyles or oversized glasses that obstruct the model's lower face
- Avoid highly reflective lip gloss or eye shadow
# 1.2 Recording Collection
# 1.2.1 Collection Process
- The recording collection process consists of two parts: silent footage and narration footage.
- Silent footage: The first 30 seconds of the entire collection process are for silent footage capture. The model faces the camera and keeps their mouth closed (simulating a listening posture, with natural and appropriate slight nods and smiles allowed, but not too many; lips must remain closed throughout the 30-second silent segment).
- Narration footage: After recording 30 seconds of silent footage, maintain the same lighting environment and model pose, then proceed to the narration footage collection phase (for digital humans used only in short video production, 5 minutes of narration footage is sufficient; for digital humans used in live streaming, the narration footage collection duration can be extended, with 20–30 minutes recommended).
- During the narration footage collection phase, the narration script content, model's speaking pace, emotions, expressions, and gestures should closely simulate the typical scenarios where the digital human will be applied (for example, if the digital human will primarily be used for travel product live streaming sales, use the actual travel product live streaming script and match the speaking pace, emotions, expressions, and gestures of a live streaming seller, simulating the real-world usage scenario as closely as possible).
# 1.2.2 Collection Precautions
Environment-related:
- Keep the set quiet during collection; no external sound interference during recording, especially no second person's voice; minimize noise from air conditioners, servers, and other equipment; avoid other site noise or environmental vibrations.
Equipment-related:
- Record at 1080×1920 resolution, 25fps, in portrait mode
- Use a microphone connected to the camera for synchronized on-site audio recording; ensure the captured audio is clear with no background noise
Model-related:
- Once the model's makeup is ready, have the model enter the frame and take position (seated or standing as per specific recording requirements)
- For green screen recording, the model should be at least 2m away from the green screen to avoid green spill (which causes poor keying results)
- Confirm that the model's face has uniform lighting with no strong shadows (especially below the nose, beside the nose, and on the neck)
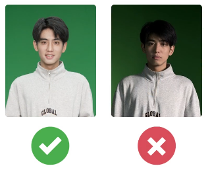
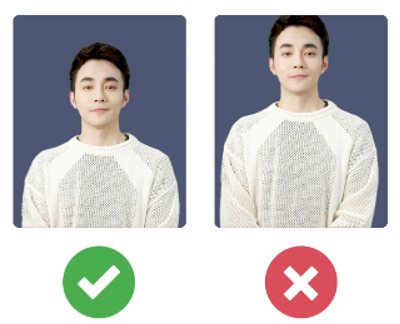
- Confirm that the model is positioned appropriately within the frame, and that body movements or hand gestures during recording will not cause the body or hands to go beyond the camera frame.
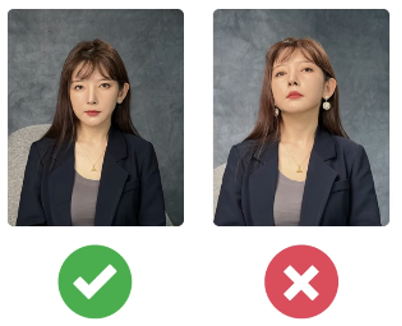
- During recording, the model should look straight ahead at the camera; avoid extreme upward, downward, sideways, or backward angles relative to the camera.
- The model should speak clearly with full lip movements. When pausing, the mouth should be fully closed with no gap; avoid situations where the mouth is "open but no sound is produced."
- Even during pauses or between sentences, keep the lips fully closed with no gap.
- The teleprompter text does not need to be read strictly word-for-word; while maintaining appropriate emotions and expressions, the model is allowed to ad-lib and bridge context naturally during narration.
- If the model experiences pauses, misreadings, mistakes, or other incidents during narration video collection, they can fully close their mouth for 2–3 seconds and then continue reading (but avoid laughing, coughing, throat-clearing, and other unrelated sounds).
- During collection, the model may use natural body language; however, body movements should not be too large — avoid large-scale shoulder and neck movements.
- Adding some gestures can make the generated model more natural, but ensure gestures do not obstruct the face.
- Throughout the entire collection process, keep the model's body and gestures within the video frame.
- Throughout the narration video collection, the expressions and emotions should mimic the intended digital human scenario — for example, if the digital human will primarily be used for live e-commerce streaming, record with the emotions and energy of a live streaming host.
# 1.2.3 Precautions for Recording with a Mobile Phone
When using an iPhone, try to turn off HDR, as the iPhone's HDR algorithm is proprietary and the HDR color representation in the video cannot be fully restored.
The iPhone outputs in MOV format; please convert to MP4 format and confirm the overall video quality before uploading for avatar generation training.
# 1.2.4 Precautions for Green Screen Recording
The principle of green screen segmentation is green removal — removing the green portions of the video. Therefore, when using green screen segmentation, be careful to avoid any green reflection, green bleed-through, or green transparency issues; otherwise, the green will be removed incorrectly, resulting in segmentation errors.
- For green screen recording, ensure there is only one shade of green; multiple shades of green will affect segmentation quality.
- For green screen recording, ensure proper lighting — make sure all green backdrop areas are green, but non-green-screen areas such as the model and objects have no green color, no green reflection, no green bleed-through, or similar phenomena.
- The model or non-green-screen areas should not have transparency or reflectivity; otherwise, green may be reflected, affecting segmentation quality.
If you are unsure about the green screen effect before or during recording, please refer to the next section "Preview Green Screen Effect in Advance" to record a test video and confirm the green screen effect beforehand.
# Green Screen Issues and Error Examples:
- Ensure the green screen area is pure green; the image below shows black objects and spots in the upper left corner and above the head.

- Ensure the green screen area is pure green: the image below shows non-green areas at the top and bottom.

- Green shadows in skirt gaps will affect the result; try to avoid areas where shadows may appear.

- Green shadows in skirt gaps will affect the result; try to avoid areas where shadows may appear.

- Due to lighting, the area between shoes at the bottom may have dark shadows that need to be avoided; otherwise, the dark-green color segmentation will have issues.

- Avoid green reflection. Green reflection makes it virtually impossible to achieve good green screen results. In the image below, the clothing is almost entirely covered in green due to strong light reflecting off the green screen, making it very difficult to achieve a good segmentation result.

- Avoid transparent objects. In the image below, green shows through the eyeglass lenses, and the glossy phone screen reflects green — both will cause segmentation errors.

- Avoid green reflection. In the image below, the shoes reflect green, causing them to be replaced with the background image.

- Avoid two shades of green. In the image below, the main issue is green reflection on the body combined with two different shades of green, making it impossible to produce a good result. Avoid shooting with dual-shade green screens.

- Avoid black border issues in edited images: The original recording is usually fine, but some green screen videos processed by editing software may have non-green color bars at the edges (sometimes a 1-pixel black border that is invisible to the naked eye, only discovered during final video compositing).

- Blue screens and other colored backdrops are supported for segmentation, but the results are not as good as green screens. Green screen recording is recommended.

# 1.2.5 Digital Human Collection Video Acceptance Criteria
Please strictly self-inspect according to the following items to ensure the video meets requirements; otherwise, training tasks may fail:
Missing face: Ensure every frame has a visible face; hands or objects must not obstruct the face or lips.
Multiple faces: Ensure no frame contains two faces (for example, a face on a poster entering the frame may cause failure).
No frame should have hands or other objects obstructing the lip area. Avoid hairstyles or oversized glasses obstructing the model's lower face. The digital human only generates lip movements; eyeglass frames near the lip area may cause lip generation errors.
Large-angle face: Face angles should be within 30°. Large angles (45° or more) are supported for recognition but have a certain probability of failure. Large-angle walking example video (opens new window)
Non-consecutive frames: Non-consecutive frames with faces in every frame will not cause failure, but the trained result will exhibit frame skipping. If non-consecutive frames have missing faces, the task will fail.
Format requirement: MP4; MOV format is not supported.
Resolution: 1080P is recommended; 4K is supported.
FPS requirement: 25fps. If not 25, the FPS will be forcibly converted to 25fps.
No external sounds should appear in the video, especially no second person's voice.
Minimize noise from air conditioners, servers, and other equipment; avoid other site noise or environmental vibrations.
For green screen recordings, ensure there is absolutely no reflective situation; such as silver jewelry, glossy eyeglass frames, glossy belts, etc.
Pay attention to lighting — do not allow green reflection on the model's body or non-green objects. Green reflection will significantly affect green screen segmentation quality; detailed guidance on improving green screen effects will be provided later.
No dynamic backgrounds (videos, animations, etc.); no reflective, transparent, or semi-transparent background materials.
Avoid highly reflective lip gloss or eye shadow as they may affect green screen segmentation quality and lip generation quality.
# 1.3 Preview Green Screen Effect in Advance
Use the PAAS platform to preview green screen effects.
# 1.3.1 Image Green Screen Effect Preview
Log in to the platform with your PAAS account.
Click "Avatar Model" at the top → "Green Screen Effect Preview."
Click "Image Green Screen Effect Preview" on the left side.
Enter the task name and upload the image or link for which you want to confirm the green screen effect. Set the background color to one that makes issues easy to spot, for example:

Click "Preview Effect" to create an image green screen effect preview task.
Once successful, you can click the preview image to view the effect; you can also click "Back" in the lower right corner → "Task Type" → "Image Green Screen Effect Preview" to view the task results.
If the effect does not meet requirements, you can adjust parameters to change the green screen effect.
# 1.3.2 Video Green Screen Effect Preview
Log in to the platform with your PAAS account.
Click "Avatar Model" at the top → "Green Screen Effect Preview."
Click the second option on the left "Video Green Screen Effect Preview."

Enter the task name and upload the video or link for which you want to confirm the green screen effect. Set the background color to one that makes issues easy to spot, for example:
Click "Preview Effect" to create a video green screen effect preview task.
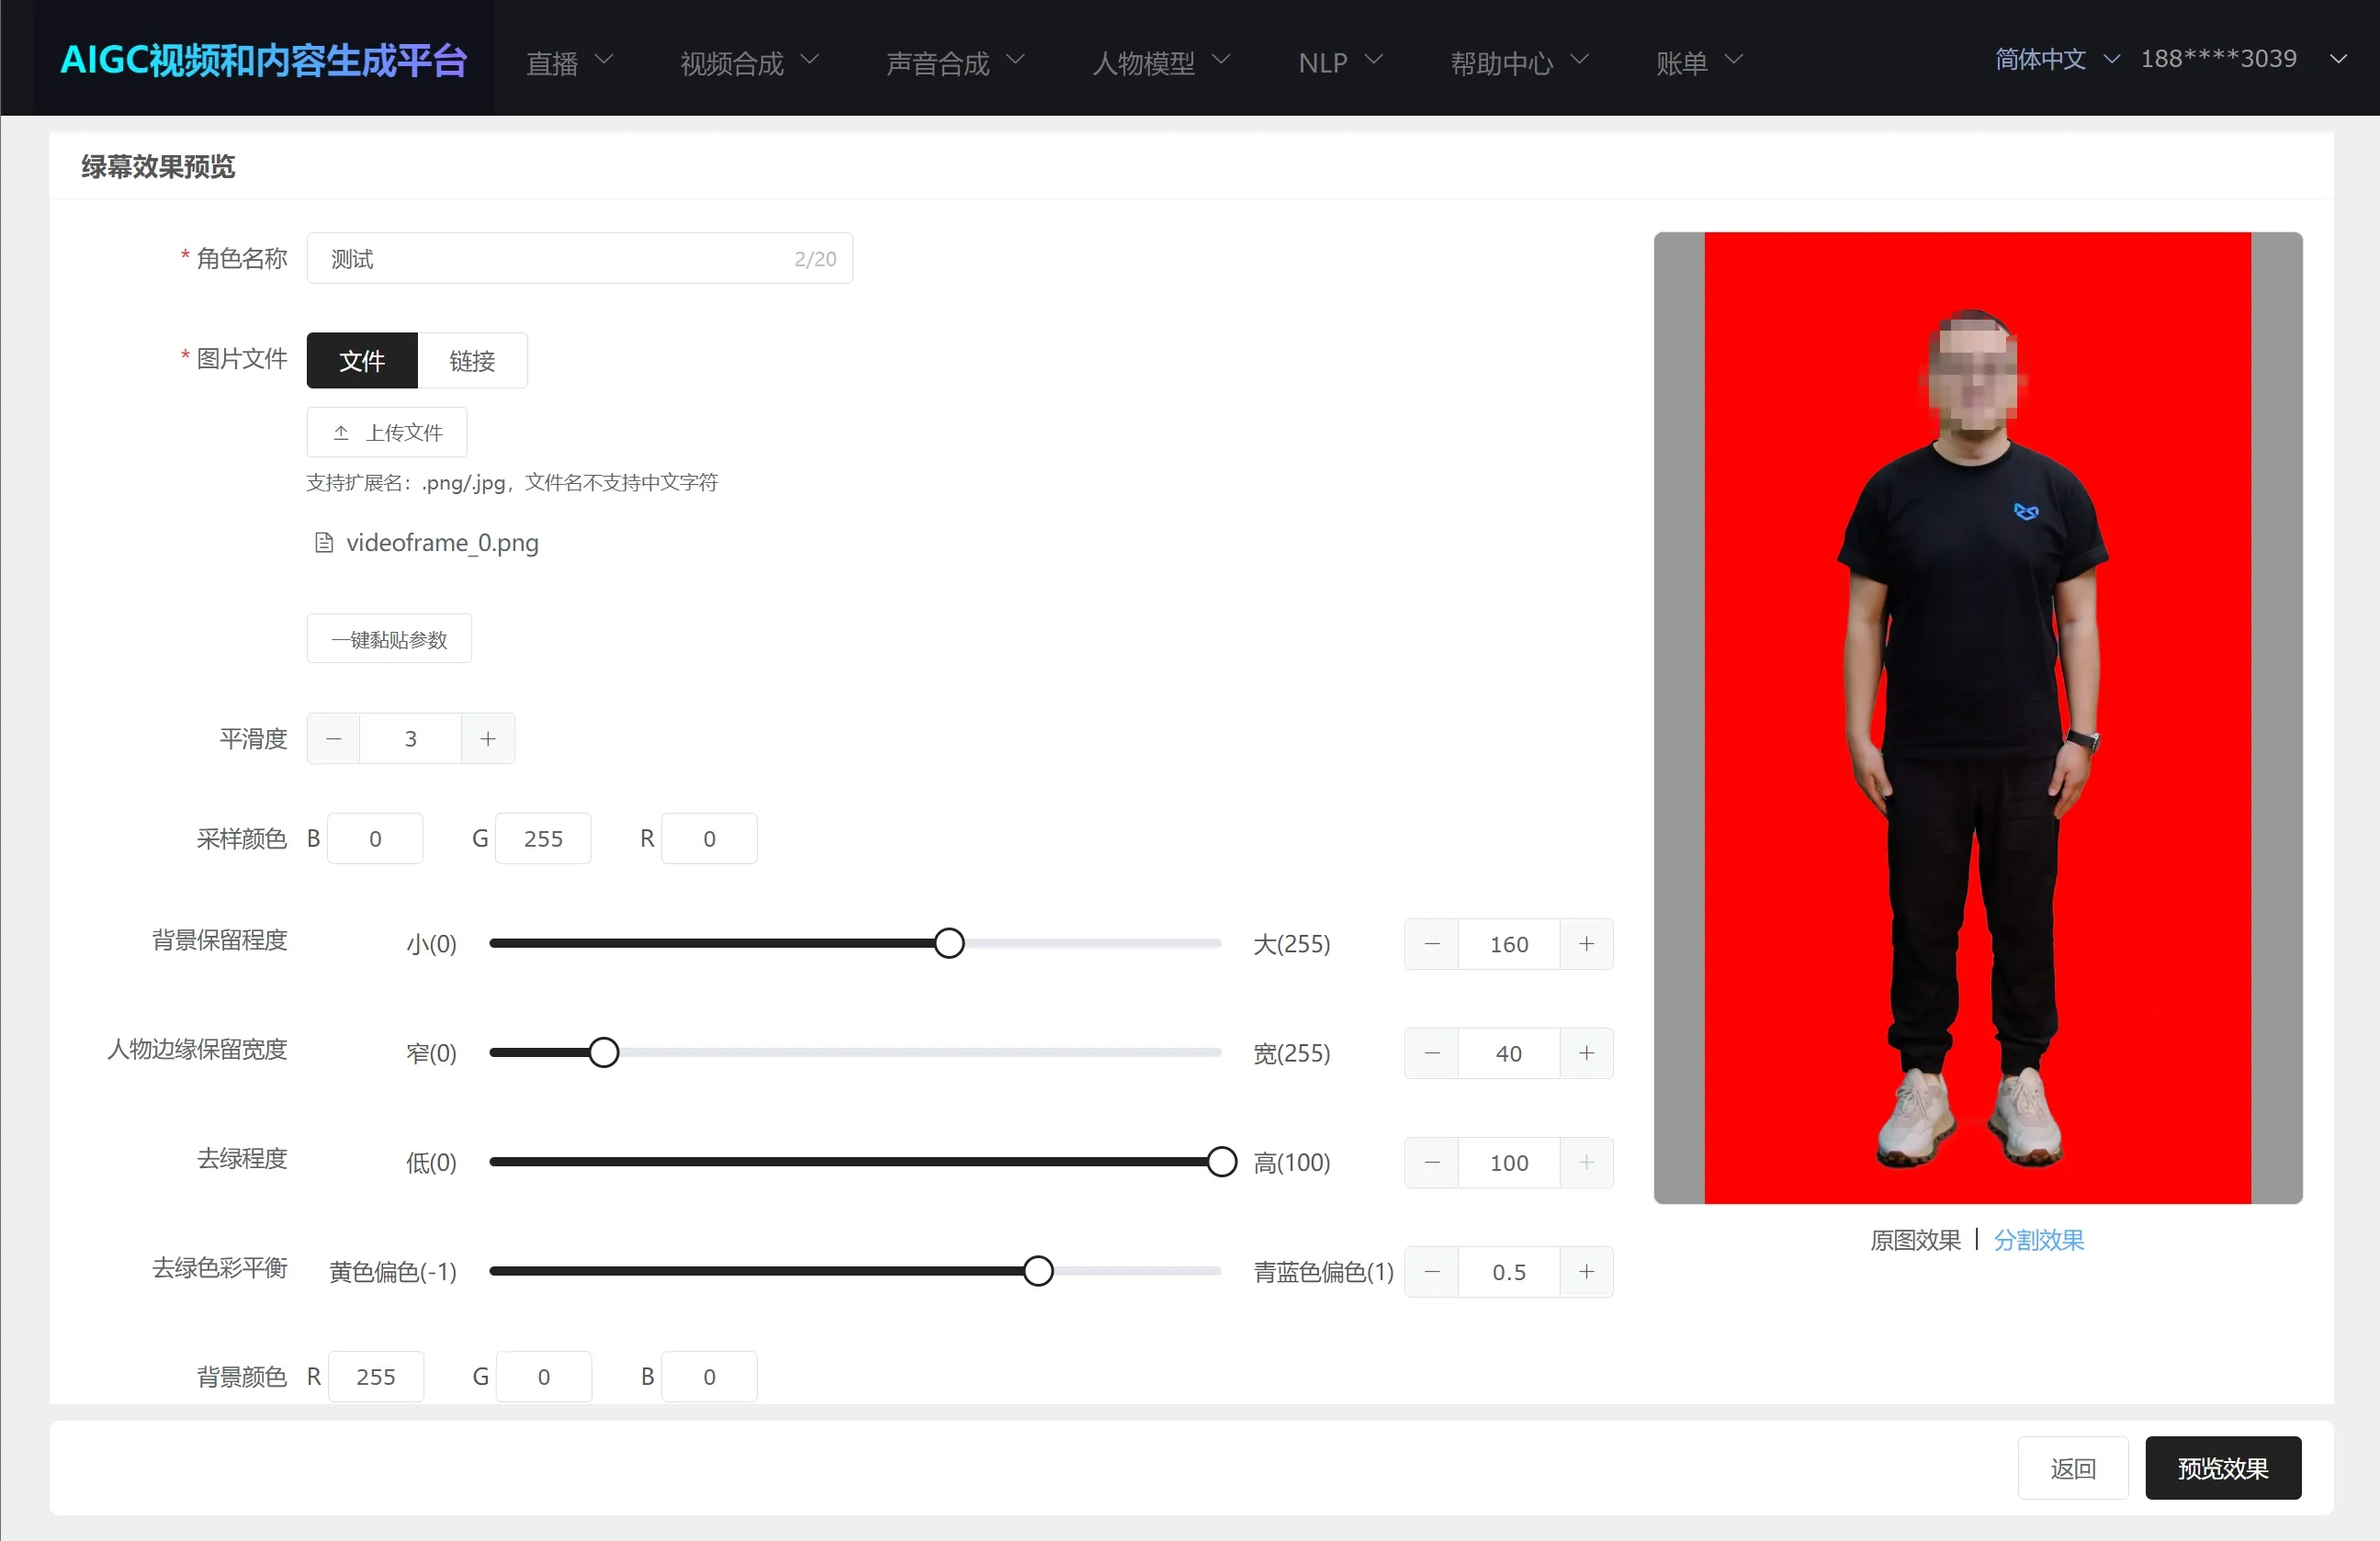
Once successful, you can click the preview image to view the effect; you can also click "Back" in the lower right corner → "Task Type" → "Video Green Screen Effect Preview" to view the task results.
If the effect does not meet requirements, you can adjust parameters to change the green screen effect.
# 1.3.3 Green Screen Parameter Descriptions and Application to Digital Human Model Training
Both during task creation and after task completion, there is a "Copy Parameters" button. The specific parameter definitions are as follows:
{
    "greenParamsRefinethHBgr": 160,    // Background retention level
    "greenParamsRefinethLBgr": 40,     // Character edge retention width
    "greenParamsBlurKs": 3,            // Smoothness
    "greenParamsColorbalance": 100,    // Green removal level
    "greenParamsSpillByalpha": 0.5,    // Green removal color balance
    "greenParamsSamplePointBgr": [     // Sampling color
        0,
        255,
        0
    ],
    "greenParamsSampleBackground": {   // Background color
        "color": [
            255,
            0,
            0
        ]
    }
}
After obtaining the parameters, they can be used when training or updating the avatar model.
# 1.3.4 Mobile Green Screen Effect Confirmation Method
For a quick and rough confirmation of on-site effects, you can also use our mobile green screen effect confirmation software, but the final effect should be confirmed on our platform.
Usage process:
Please contact our sales or after-sales team to request a trial of our Effects Demo.
After downloading and installing Effects Demo, enter the home page and click "Effects."
Select the "Segmentation" item.
You can switch to the rear camera and point it at the green screen environment.
Click green screen segmentation to confirm the effect. There are 3 default background images, and you can also select an image from your phone as the background to confirm the effect.

# 2. Premium Digital Human Collection Standards
# 2.1 Recording Collection Requirements
Model-related:
- Total collection video length is approximately 5 minutes, no change.
- The model's movements during collection consist of two parts: 30 seconds of silent footage, followed by approximately 4.5 minutes of narration footage. No change.
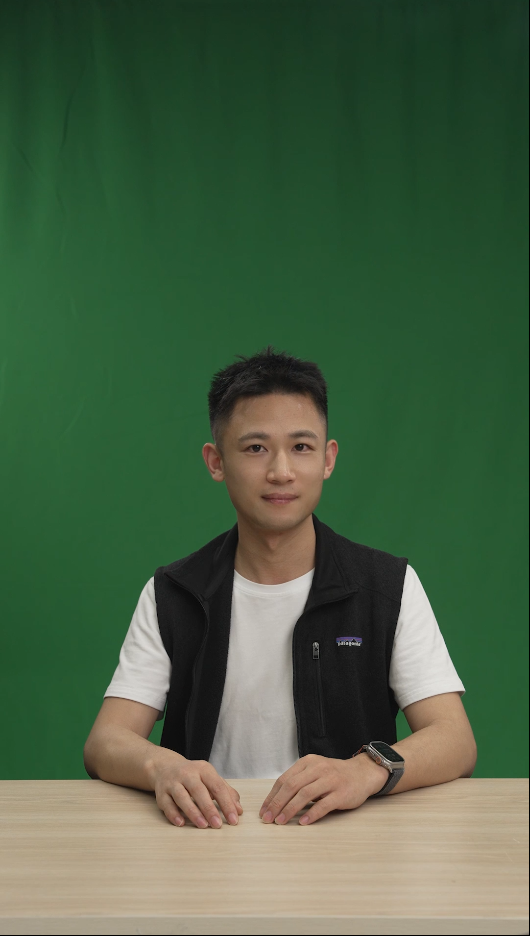
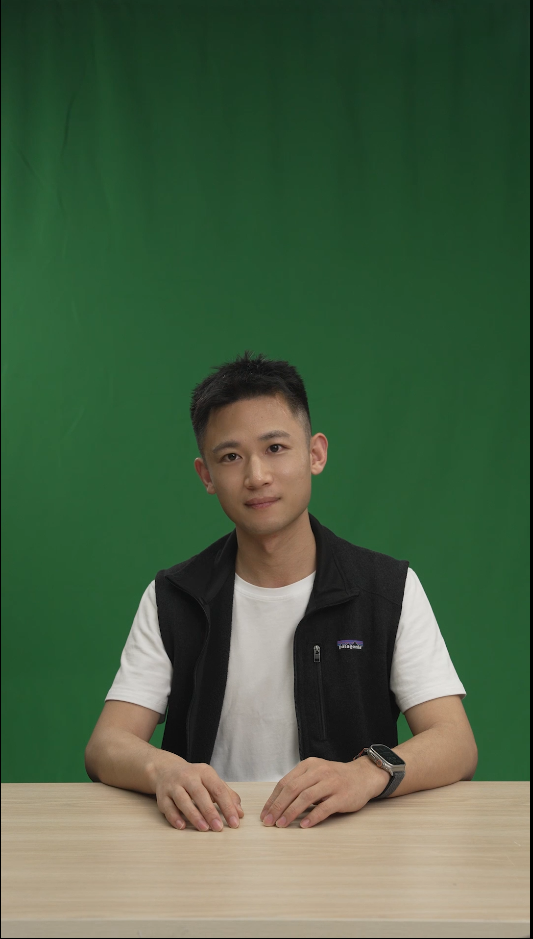
- Set the static body posture as the default pose. The entire static portion should primarily use the default pose — simulating a listening state with natural and appropriate slight nods and smiles, but not too many; lips must remain closed throughout the 30-second silent segment. = Default pose concept added =.
Static footage illustration
- The narration footage should begin from the default pose. After performing body movements and arm actions, the model needs to return to the default pose (consistent body posture, arm position, and hand actions). Generally, the time for the model to go from default pose → perform action → return to default pose should be controlled within 10 seconds. After returning to the default pose, the next action can begin, cycling through this pattern — constantly returning to the default pose after completing each business action.
- Entering narration footage action
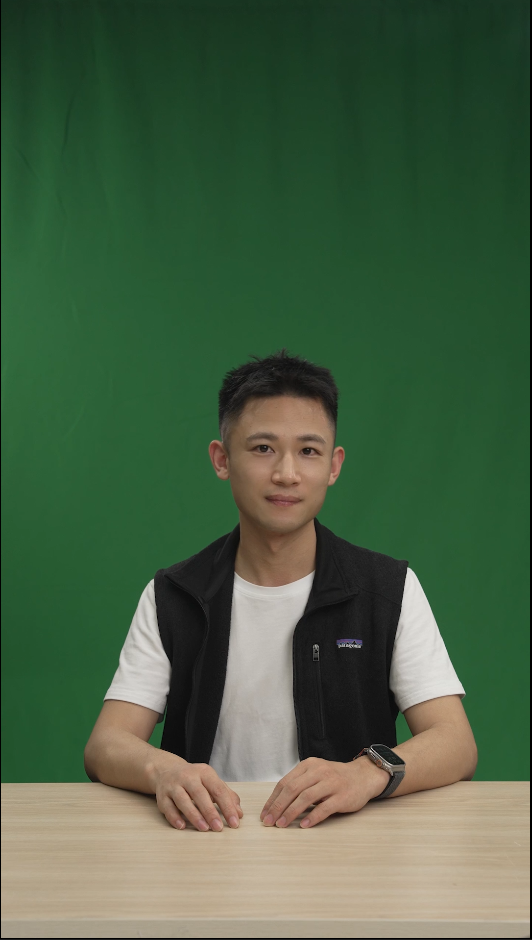
- Action 1 during narration footage
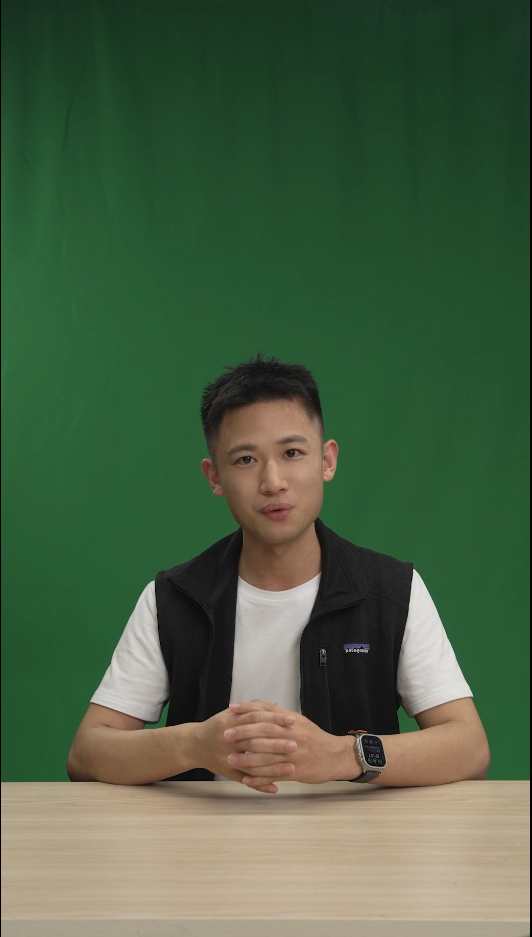
- Return to default pose
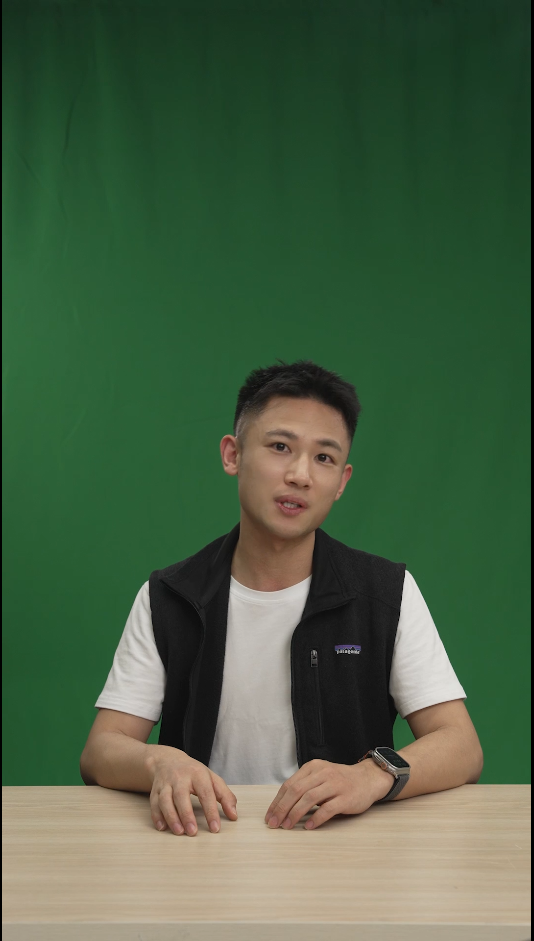
- Action 2 during narration footage
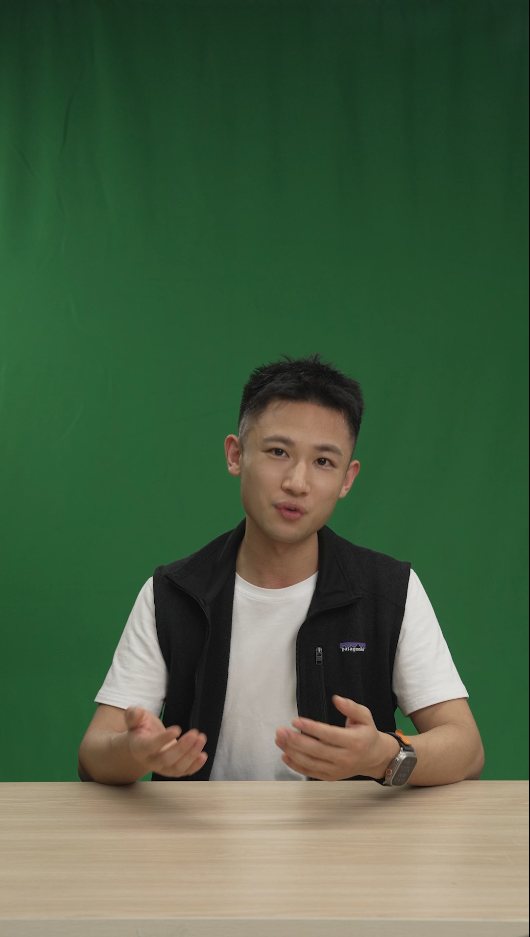
- Return to default pose
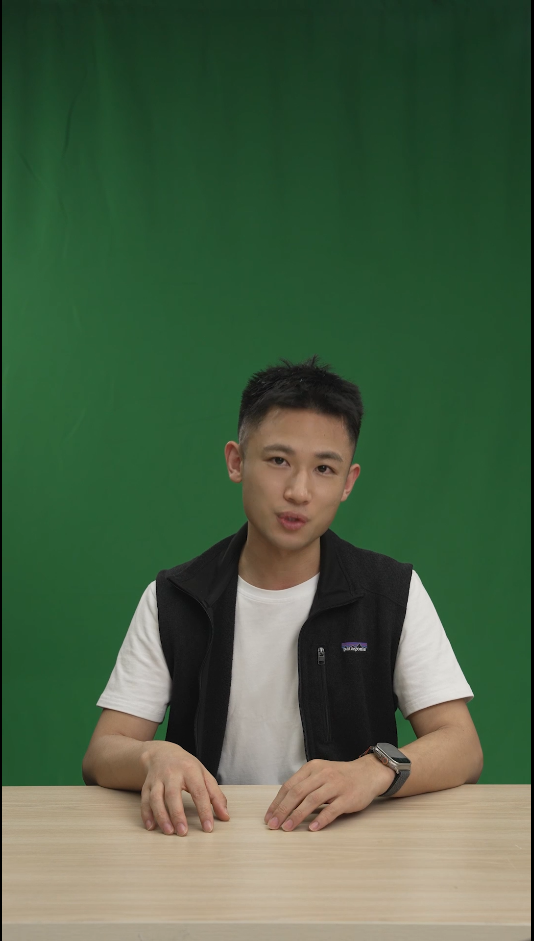
# 2.2 Premium Digital Human Acceptance Criteria
Please strictly self-inspect according to the following items to ensure the video meets requirements; otherwise, training tasks may fail or produce poor results:
Please refer to Section 2.5; the standard digital human collection acceptance criteria must be met first.
When returning to the default pose, the silent pose must be consistent each time. Be sure to return to the exact original position.
# 3. Motion-Editable Digital Human Collection Standards
# 3.1 Video Requirements
The motion-editable digital human requires two separate video outputs:
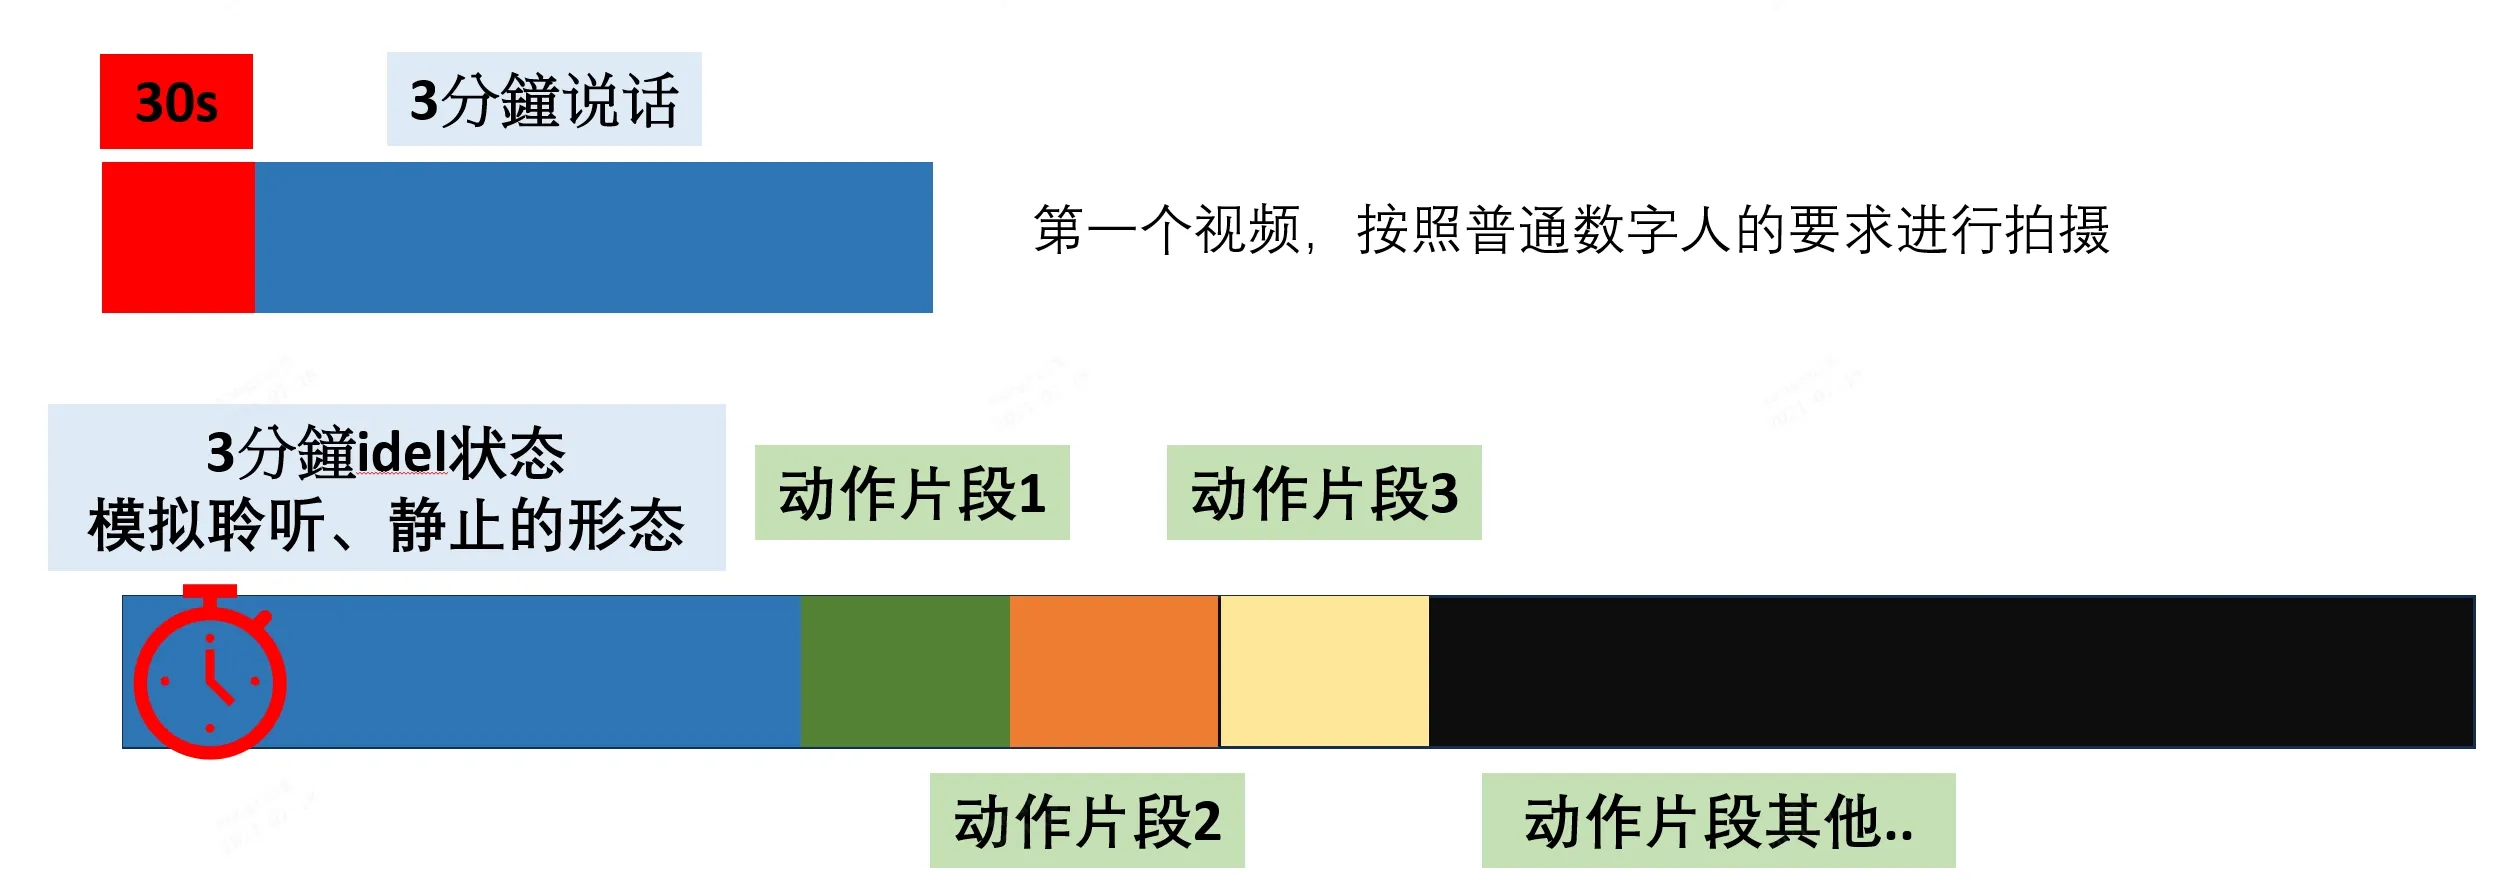
Standard digital human training video: Used for lip movement training, requiring a duration of 3.5 minutes, with the first 30 seconds in silent mouth-closed state and 3 minutes in speaking state.
Motion editing training video: Used for training different motion edits, with strict requirements. Please follow the requirements below carefully during recording; otherwise, the results may not meet expectations. Motion editing example video (opens new window)
# 3.2 Recording Requirements
The standard digital human training video portion is used for lip movement training; the recording method is the same as for standard digital human recording.
The model's posture, camera state, and scene in the standard digital human training video must remain consistent with the motion editing training video.
The motion editing training video consists of an idle action, regular action 1, regular action 2, regular action 3, regular action 4, regular action N, etc. Each action's start and end positions must be exactly the same as the idle position. This is critical — if the model does not return to the idle state after each action, errors will occur during subsequent motion editing display. This places high demands on the recording model; please ensure consistency as much as possible.
The recommended idle action length is within 3 minutes; other actions should be within 10 seconds, with approximately 3 seconds recommended. See the practical operation guide for specific cases.
The motion editing training video has no requirements for ambient audio; background noise is acceptable since only the motion video content from the current video will be used.
The idle action and subsequent different actions can be recorded separately, but the final submission must be merged into a single video.
Since the recording difficulty is high, it is recommended to prepare a recording script in advance and rehearse with the model beforehand. An example script is as follows:
| Recording Content | Duration | Reference Effect | ||
|---|---|---|---|---|
| 1 | Basic lip movement recording | 5 min 30 sec | Same as previous version standard | |
| 2 | Idle static action recording | Start: 35.4 End: 37.32 | 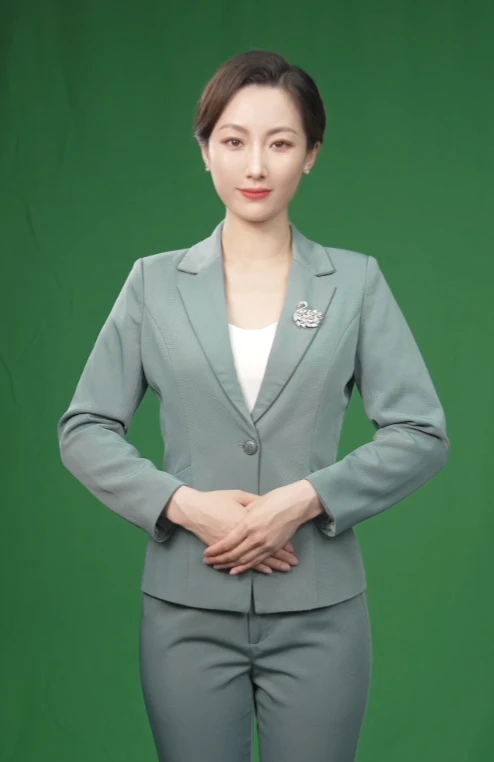 | Head should have natural breathing-like movements, simulating listening to someone's question |
| 3 | idle - Right hand wave hello - idle | Start: 8.5 End: 11.4 | 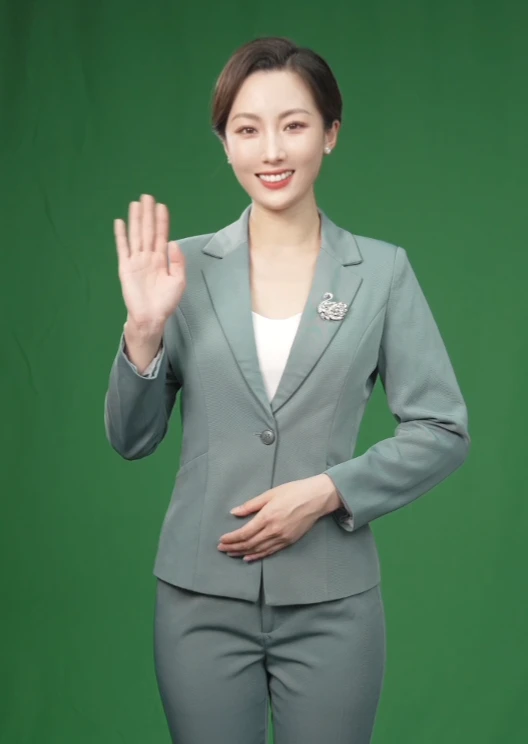 | |
| 4 | idle - Right hand present right - idle | Start: 26.64 End: 29.32 |  | |
| 5 | idle - Right hand speaking emphasis - idle | Start: 19.4 End: 23.92 | 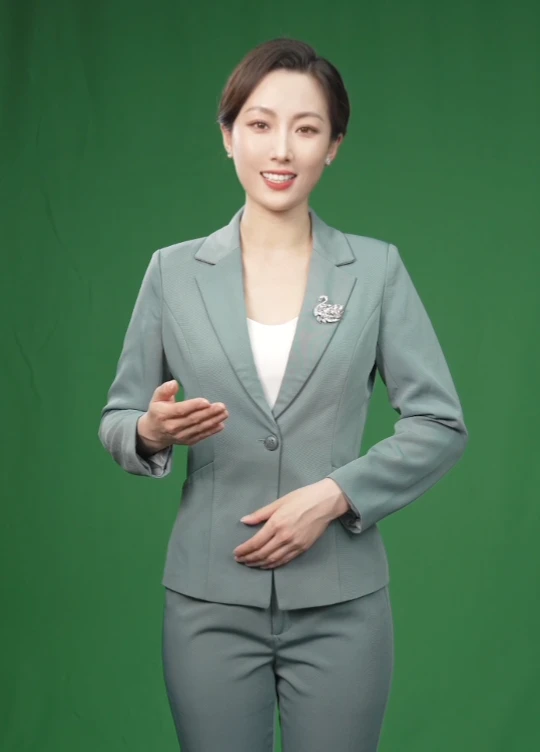 | |
| 6 | idle - Right hand forward - idle | Start: 14.88 End: 17.92 | 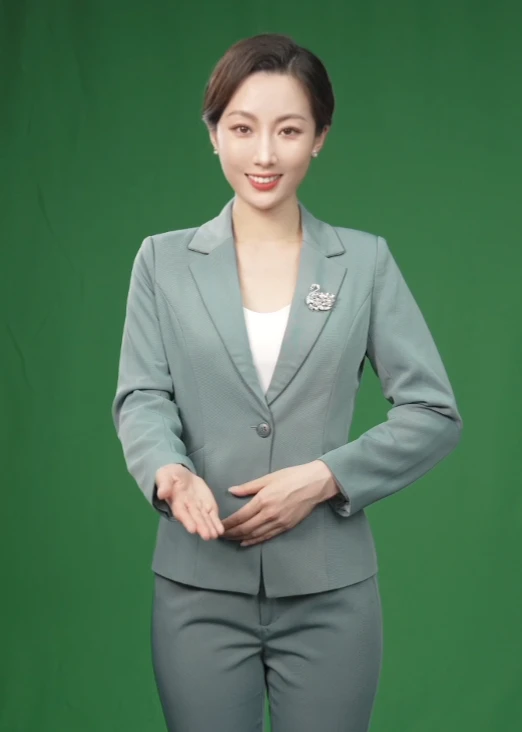 | |
| 7 | idle - Right hand upward - idle | Start: 32.52 End: 35.48 | 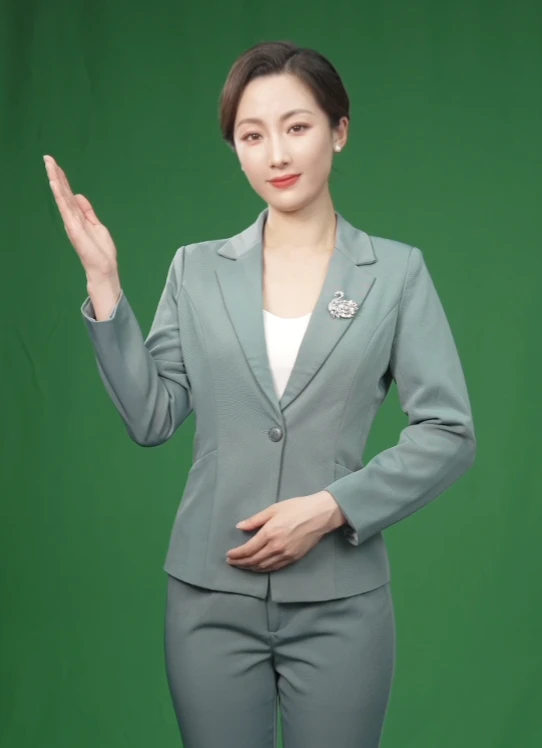 | |
| 8 | idle - Right index finger emphasis - idle | Start: 37.48 End: 43 | 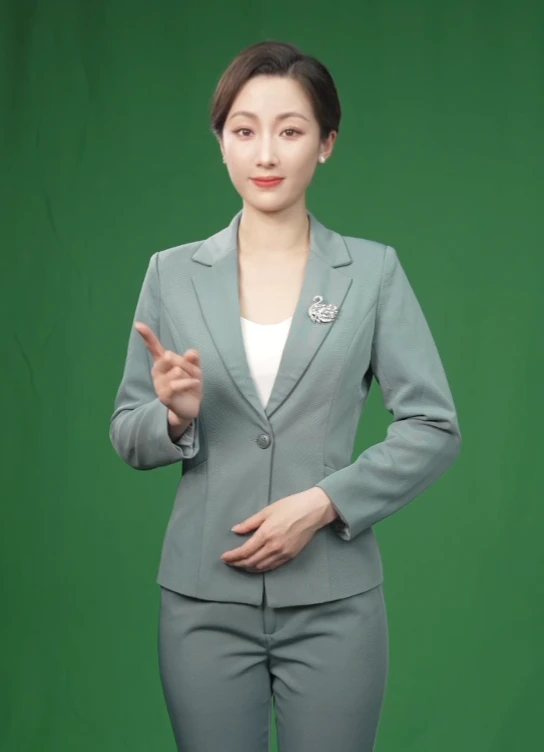 | |
| 9 | idle - Right hand thumbs up - idle | Start: 47.12 End: 49.56 | 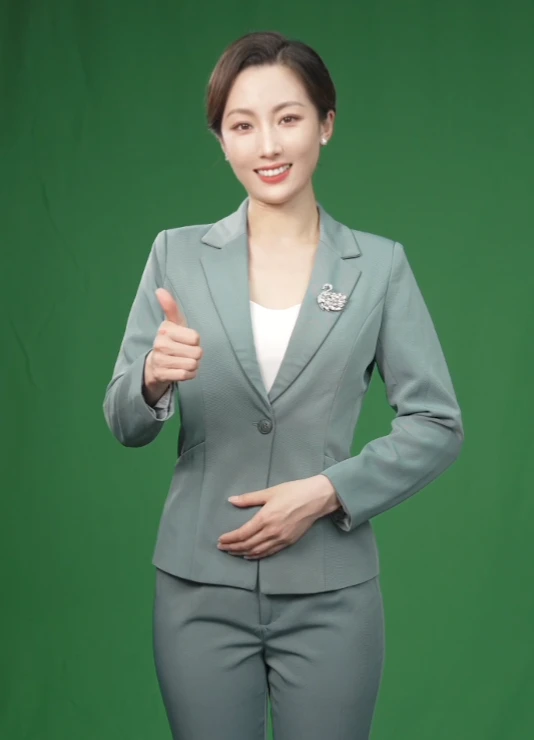 | |
| 10 | idle - Right hand OK - idle | Start: 53.56 End: 55.72 | 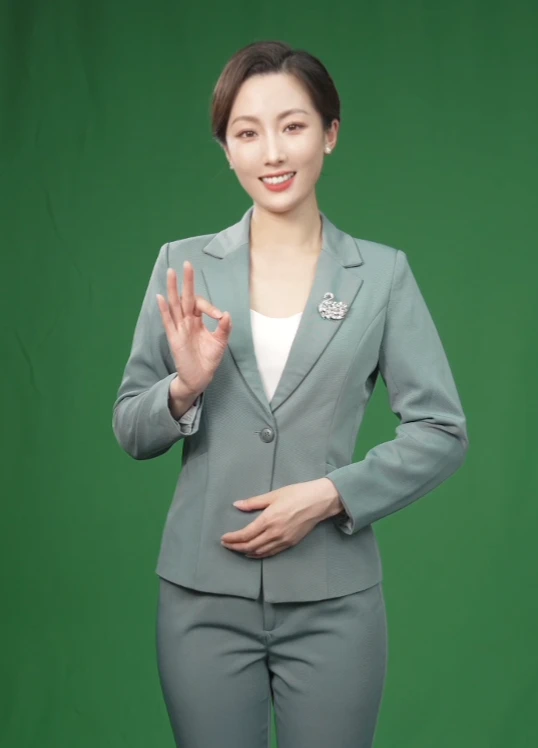 | |
| 11 | idle - Right hand heart - idle | Start: 59.8 End: 62.12 | 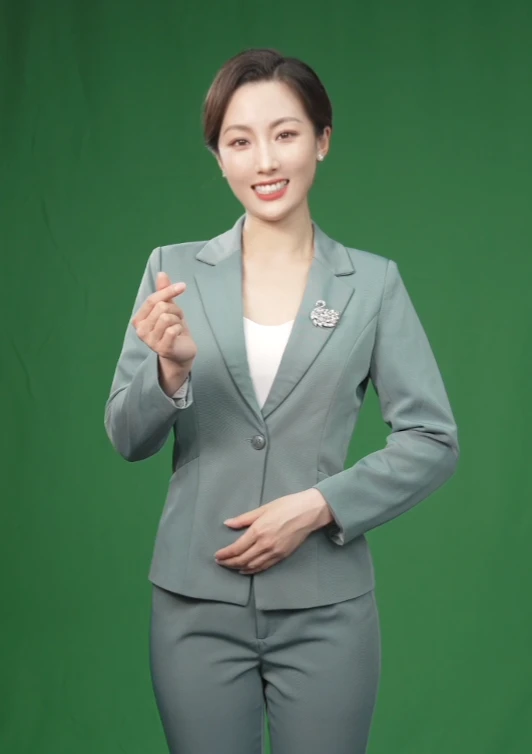 | |
| 12 | idle - Right fist - idle | Start: 64.32 End: 66.4 |  | |
| 13 | idle - Right palm presenting - idle | Start: 70.4 End: 73.28 | 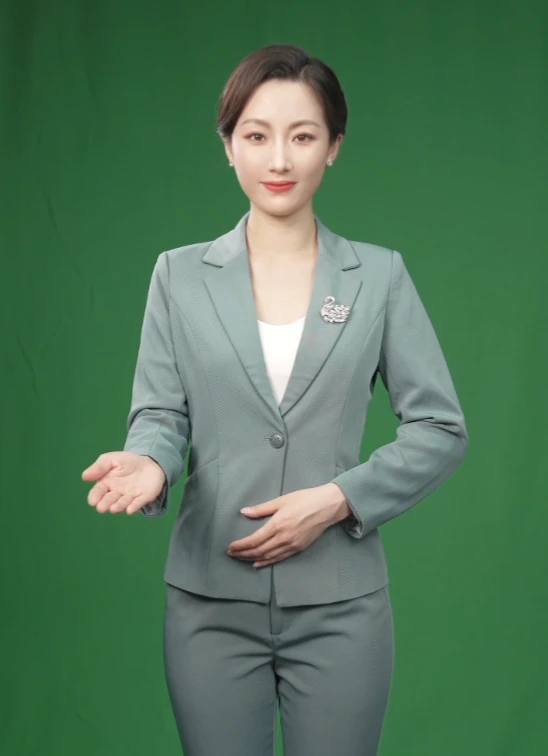 | Right palm facing up, sweeping from left to right |
| 14 | idle - Left hand present forward - idle | Start: 78.48 End: 81.88 | 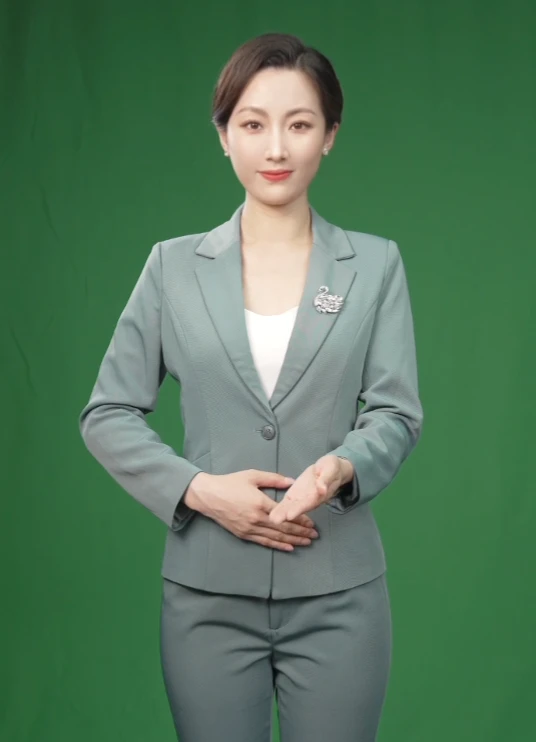 | Recommend right hand hanging naturally |
| 15 | idle - Left hand speaking emphasis - idle | Start: 92.4 End: 96.4 | 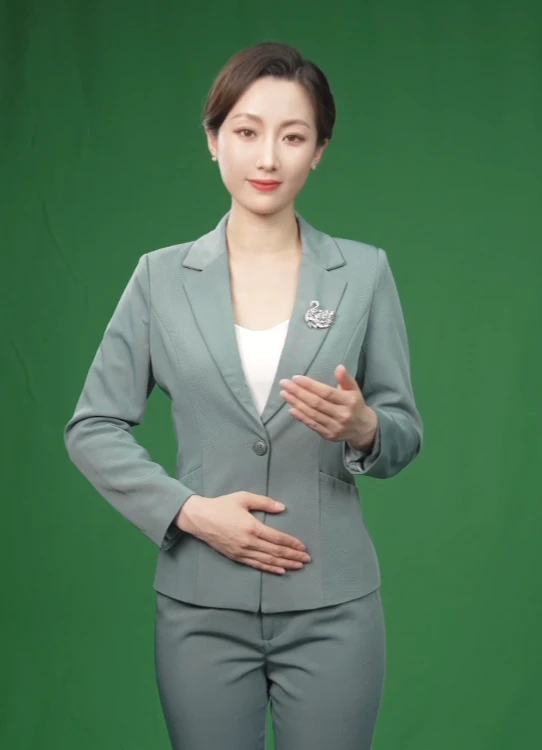 | Recommend right hand hanging naturally |
| 16 | idle - Both hands open welcome - idle | Start: 99.76 End: 102.36 | 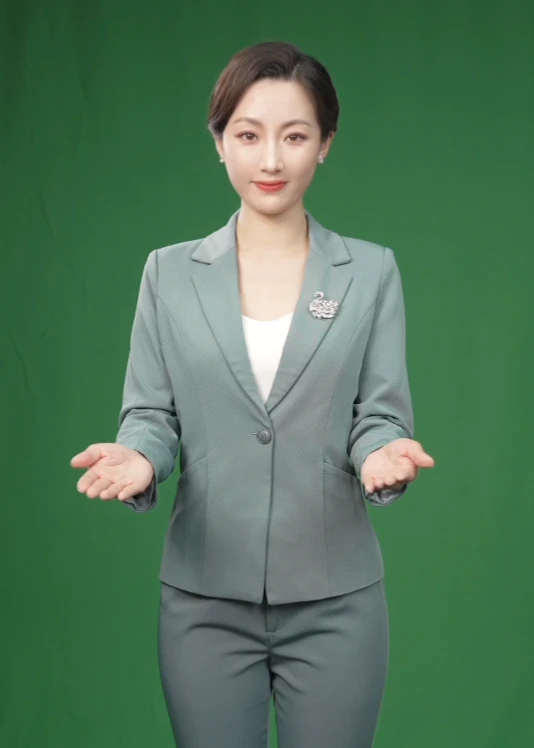 | Open hands, hold briefly, then close |
| 17 | idle - Both hands open emphasis - idle | Start: 107.68 End: 114.4 | 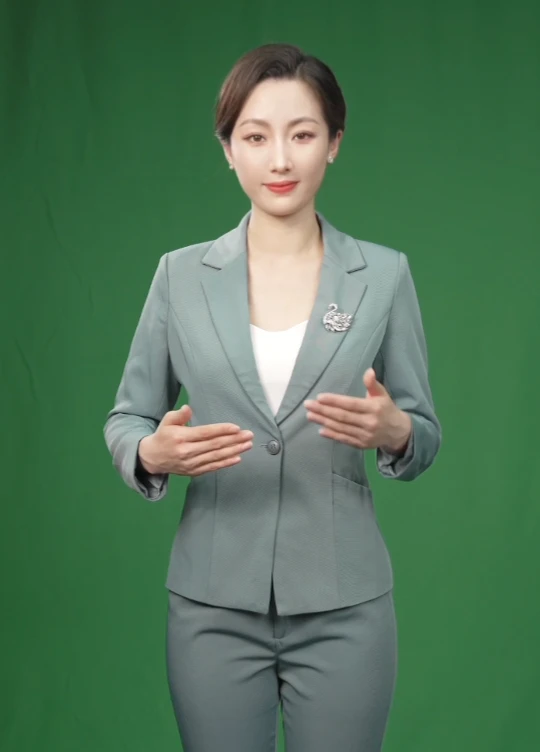 | Both hands emphasizing with slight back-and-forth swaying |
| 18 | idle - Both hands spread out - idle | Start: 116.84 End: 121.8 | 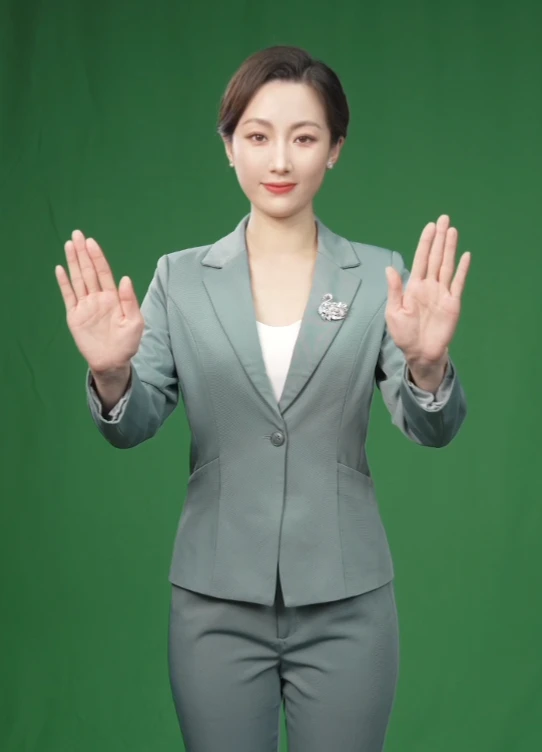 | Simulating playing a video in front of the digital human — please watch the video displayed below the screen |
# 3.3 Motion-Editable Digital Human Acceptance Criteria
Please strictly self-inspect according to the following items to ensure the video meets requirements; otherwise, training tasks may fail or produce poor results:
For the standard digital human training video portion, please refer to Section 2.5; the standard digital human collection acceptance criteria must be met first.
For the motion editing training video, the starting action and return action of each motion must be consistent with the idle position every time. Be sure to return to the exact original position; otherwise, the actual effect will be impacted.
# 4. Multi-Scene Video Digital Human Collection Standards
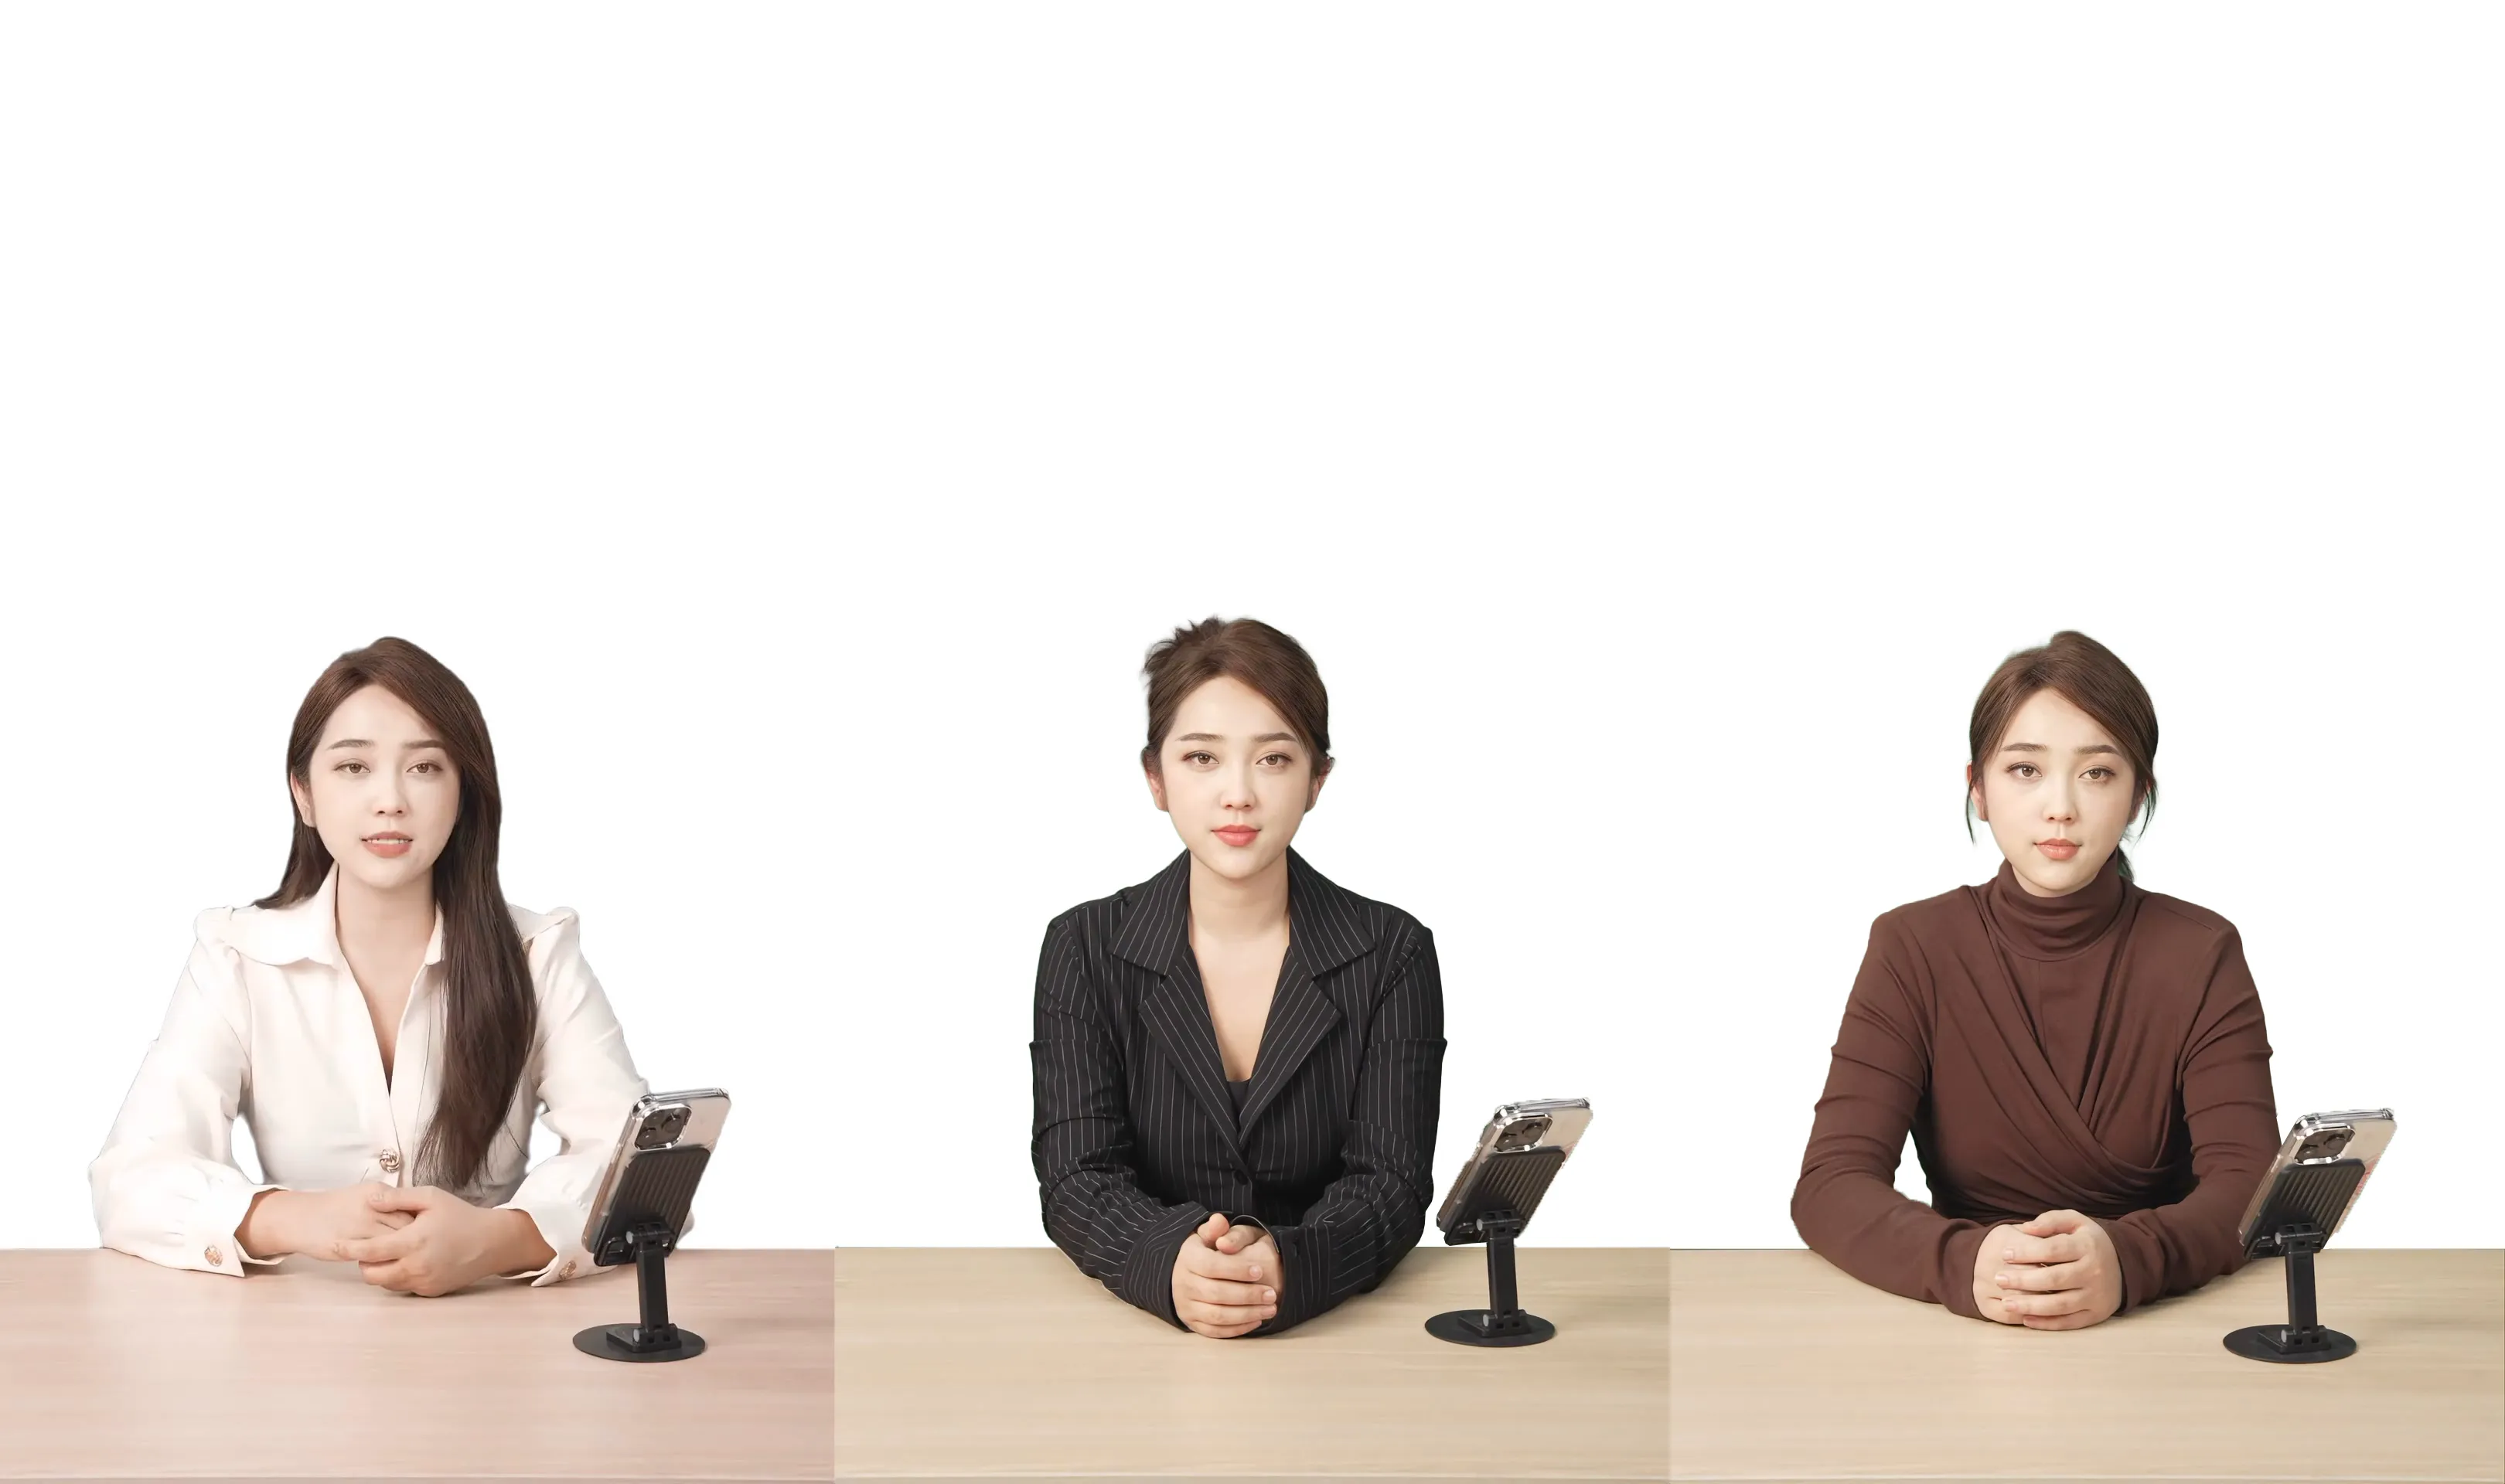
Multi-scene digital human collection has additional requirements on top of Chapter 1 requirements. It is used for recording the same person with multiple outfits/multiple camera angles, submitted together in a single training task.
# 4.1 Multi-Scene Recording Requirements
Multi-scene digital human recording videos are divided into a primary video and auxiliary videos.
Common requirements for primary and auxiliary video recording:
- Same subject (consistent makeup and styling); the same person with different makeup and styling is considered a different subject.
- Facial area lighting conditions must remain consistent. Example: If the primary video lighting and auxiliary video lighting are inconsistent, the condition is not met.
- Face angle must remain consistent. Example: Both the primary video and auxiliary video should have the subject facing the camera directly. If one is angled left and the other right, the condition is not met.
- The subject can wear different outfits.
- The subject can appear at different sizes on screen (e.g., full body, half body).
- Scene props can vary (e.g., with table, without table, bar stool, sofa, etc.)
Primary video recording requirements:
- No special requirements; 30 seconds silent followed by 4.5 minutes speaking, same as Sections 2.1 and 2.2 requirements.
Auxiliary video recording requirements:
- No 30-second silent segment needed.
- Start speaking and performing corresponding body movements immediately when recording begins; total length of 3–4 minutes is sufficient.
# 5. Using the PAAS Platform to Generate Digital Human Models
# 5.1 Generate Avatar Training Task
Log in to the platform with your PAAS account.
Click "Avatar Model" at the top → "Avatar Model Generation." The current page shows all submitted task statuses (limited to tasks within the last 7 days).
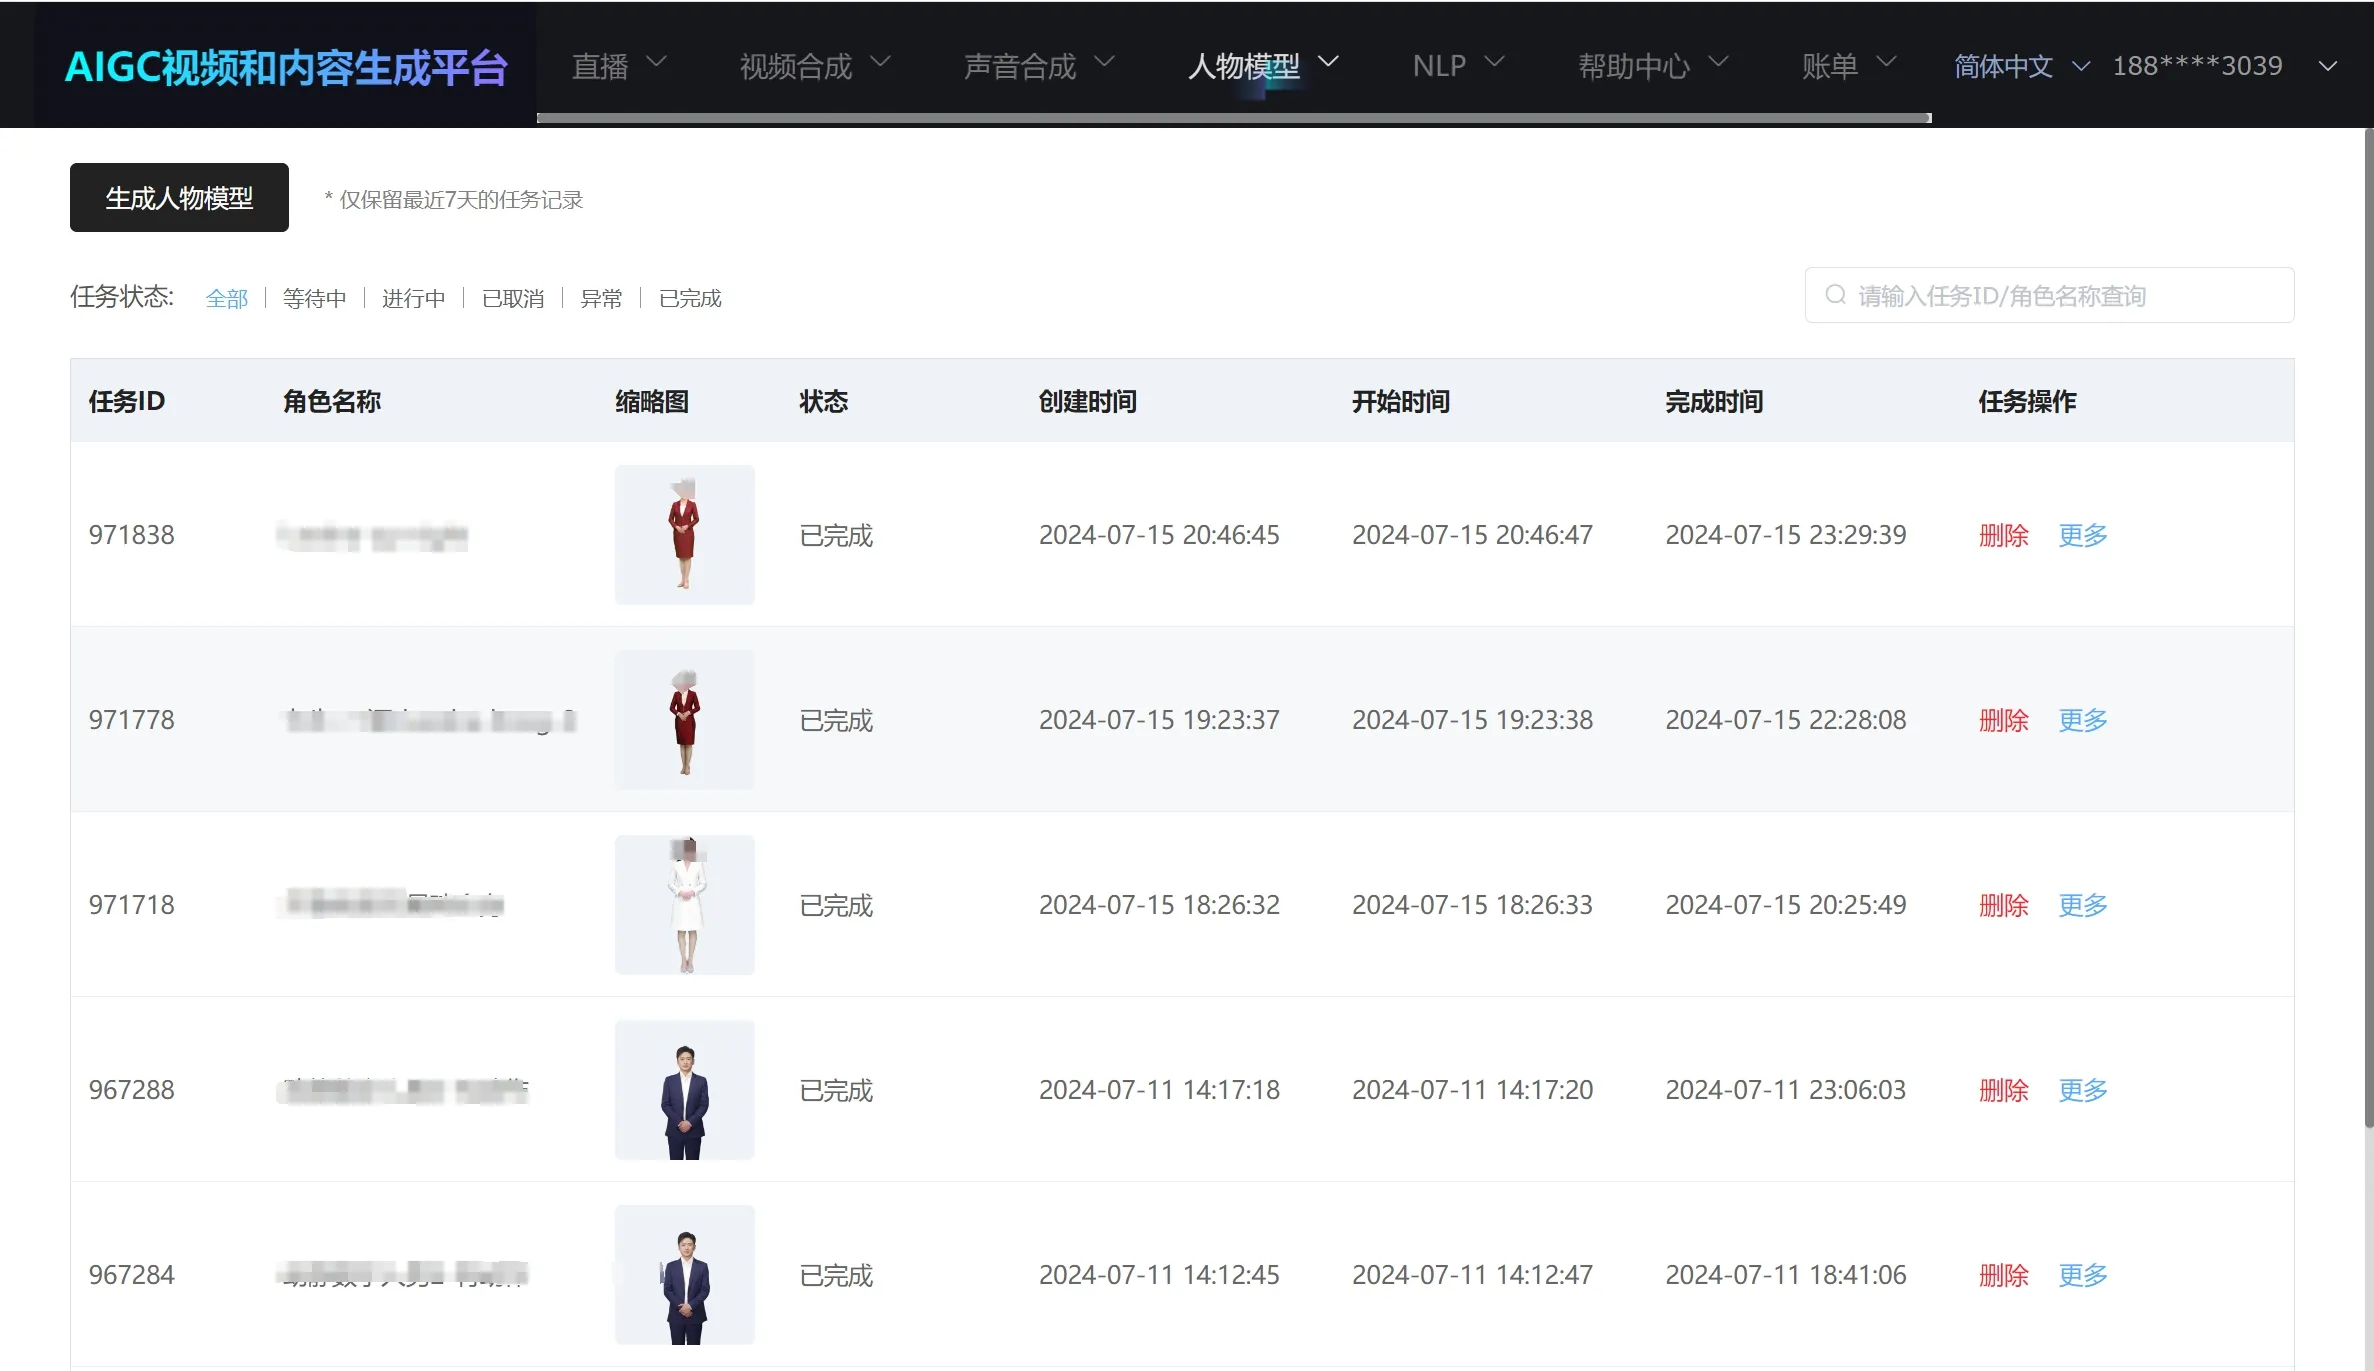
Click "Avatar Model Generation" on the left to enter the task model generation page.
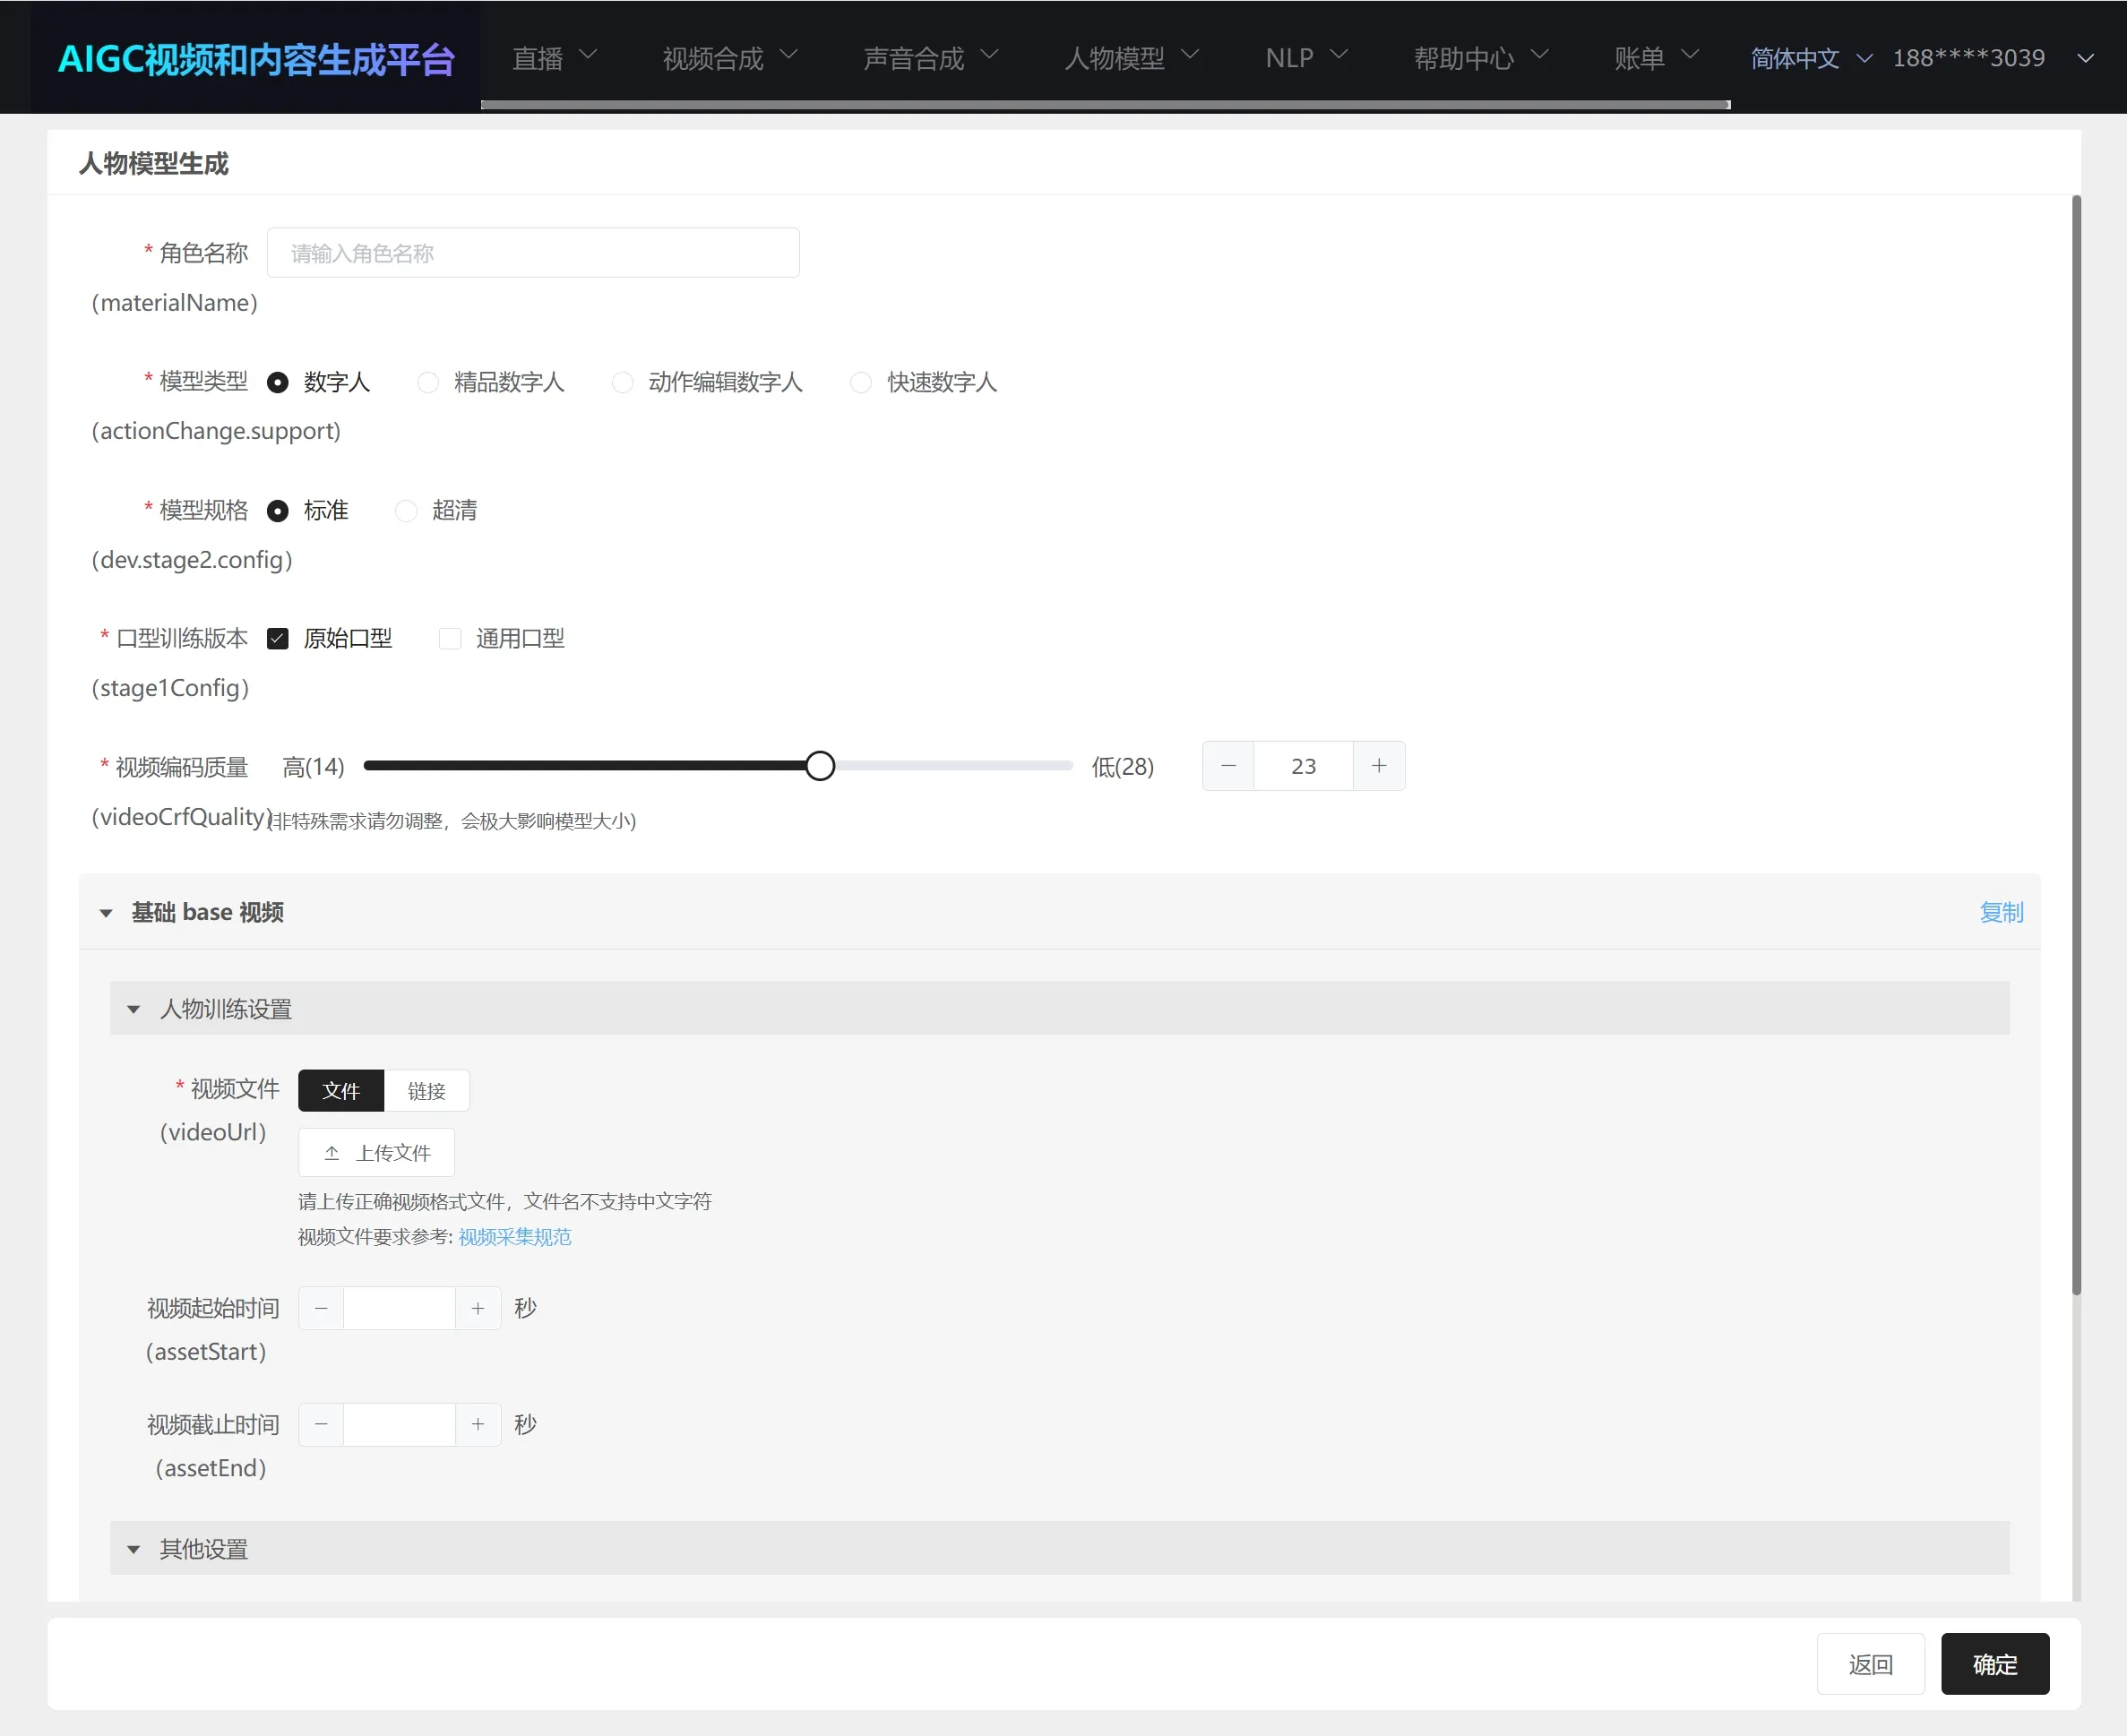
For detailed parameter usage, please refer to the parameter details at the end.
After submitting the task, a 2K video typically takes 4–8 hours to complete.
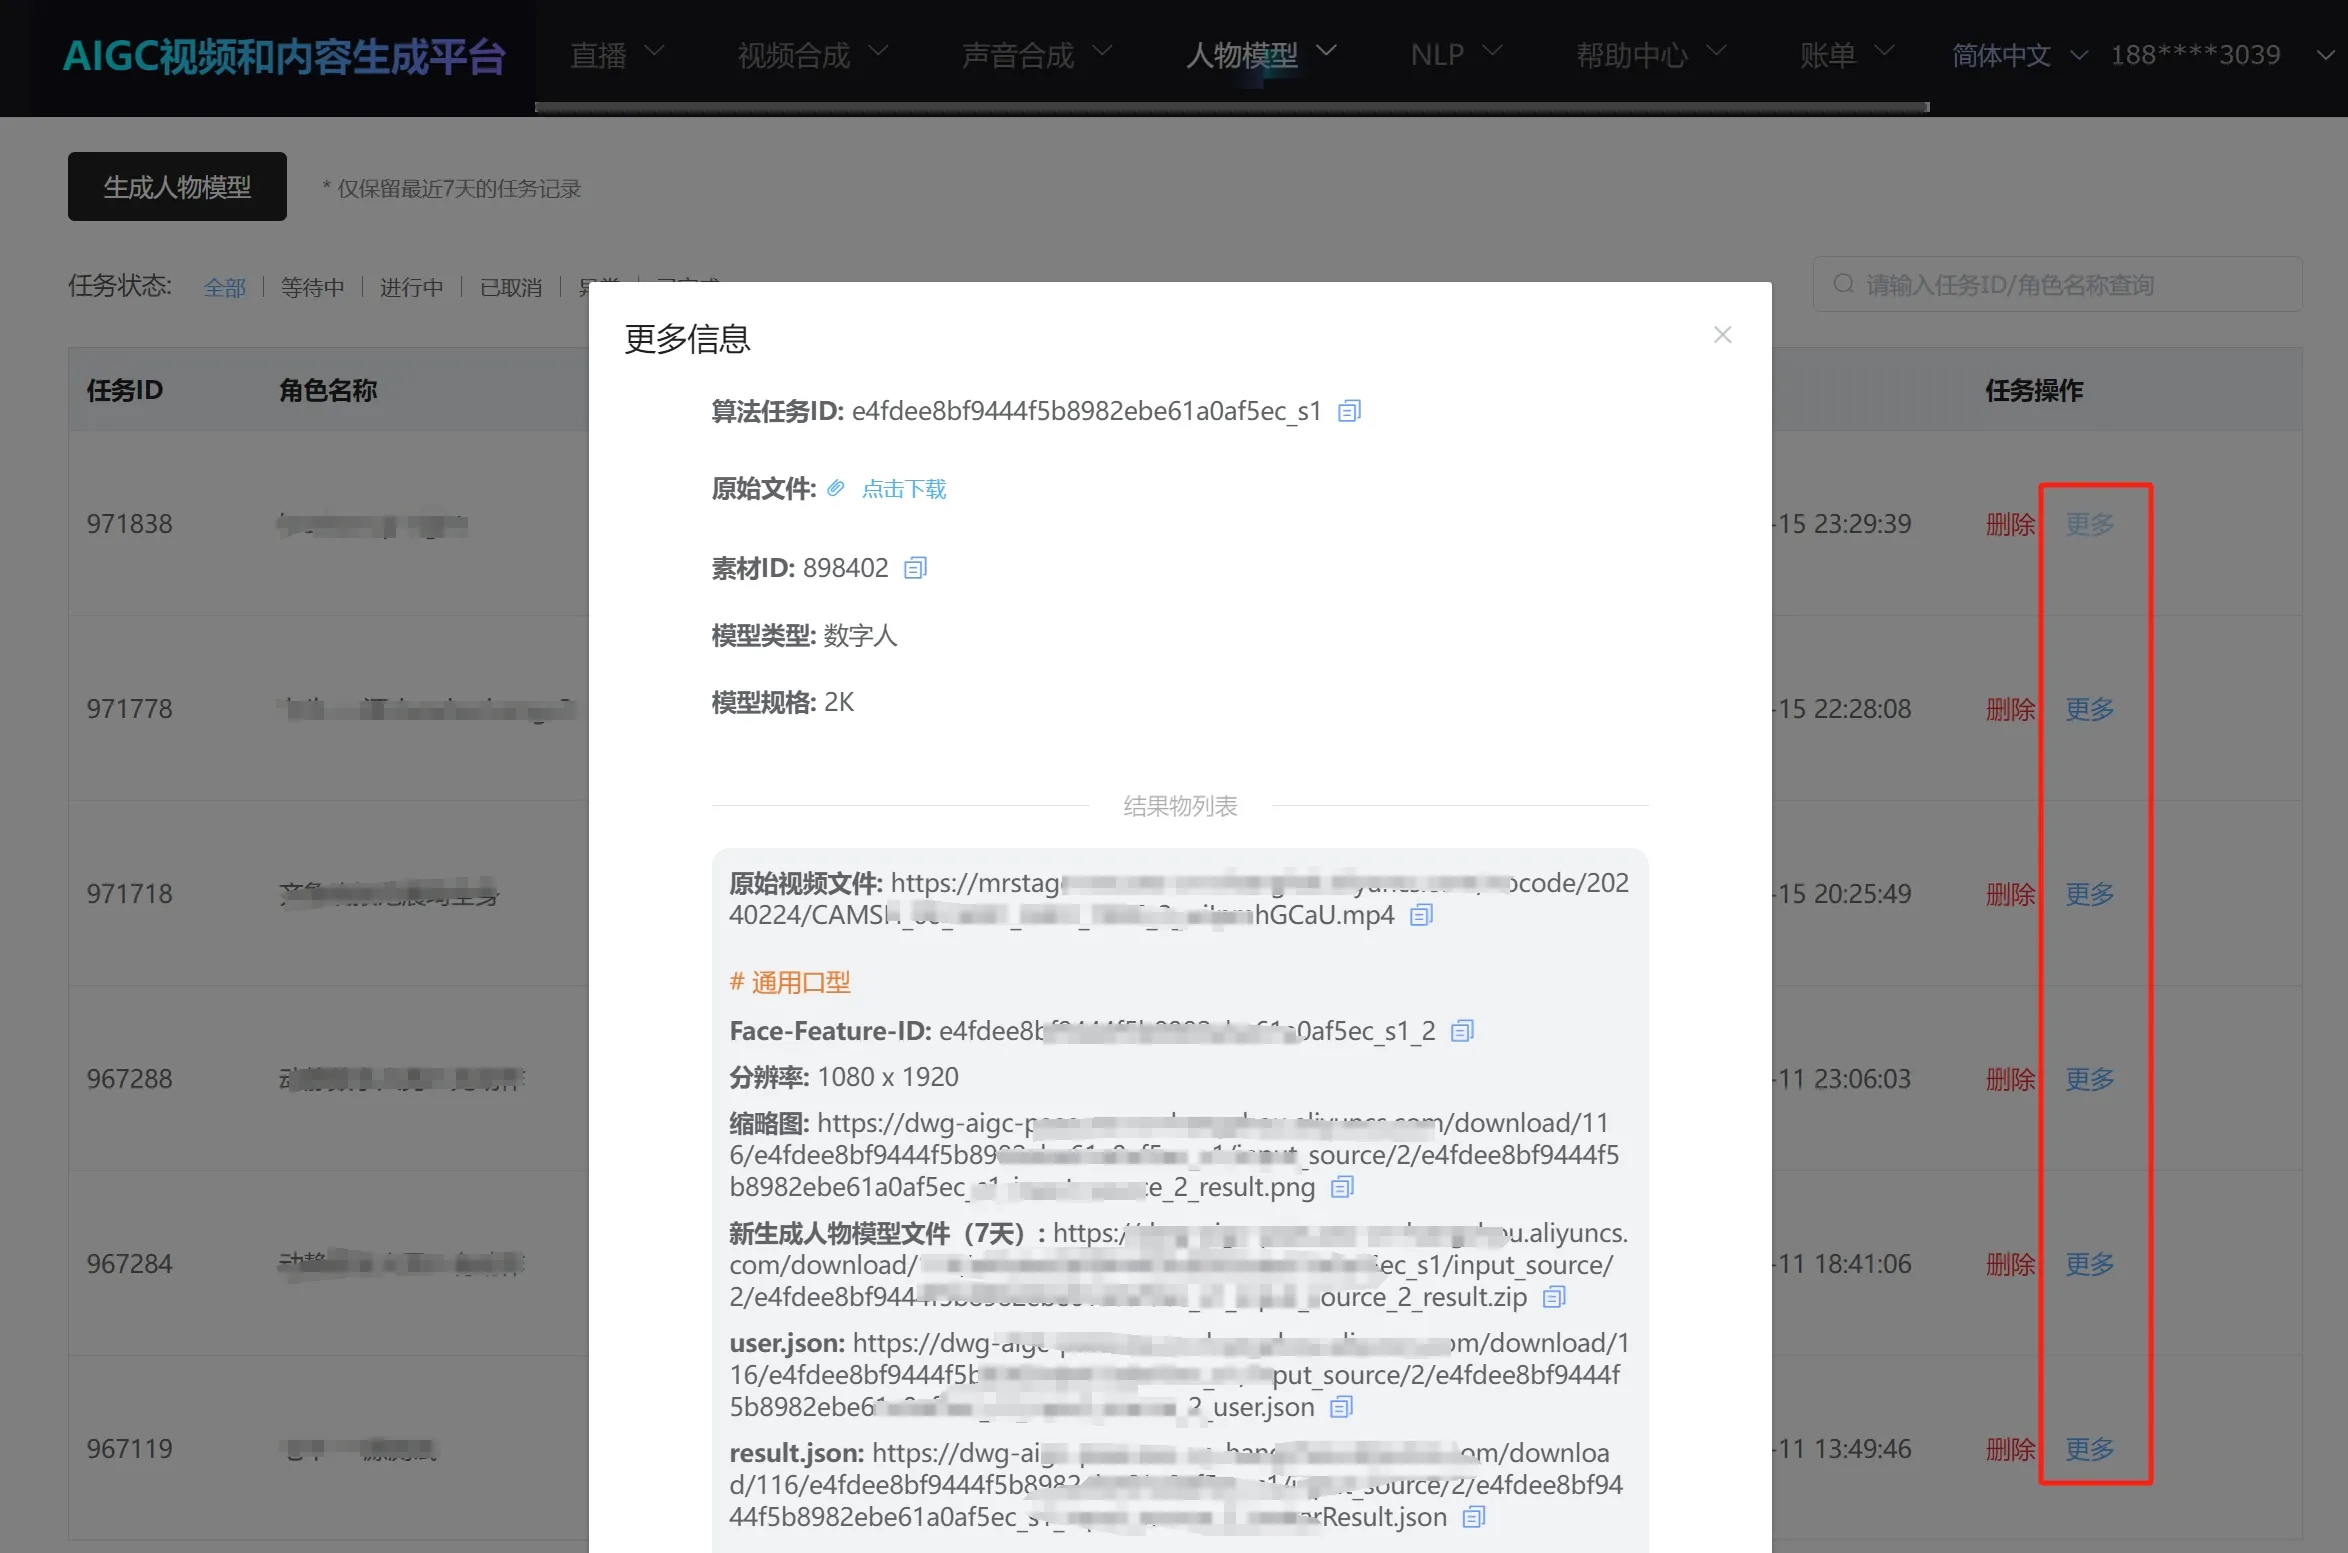
Once the task is completed, you can see the finished task in "Avatar Model" → "Avatar Model Generation." Click "More" to view the generated avatar data information.
# 5.2 Auxiliary Video / Multi-Scene Video Avatar Training Task
Log in to the platform with your PAAS account.
Click "Avatar Model" at the top → "Avatar Model Generation." The current page shows all submitted task statuses (limited to tasks within the last 7 days).
Click "Avatar Model Generation" on the left to enter the task model generation page.
Add the first video first, then add other videos' specific information sequentially.
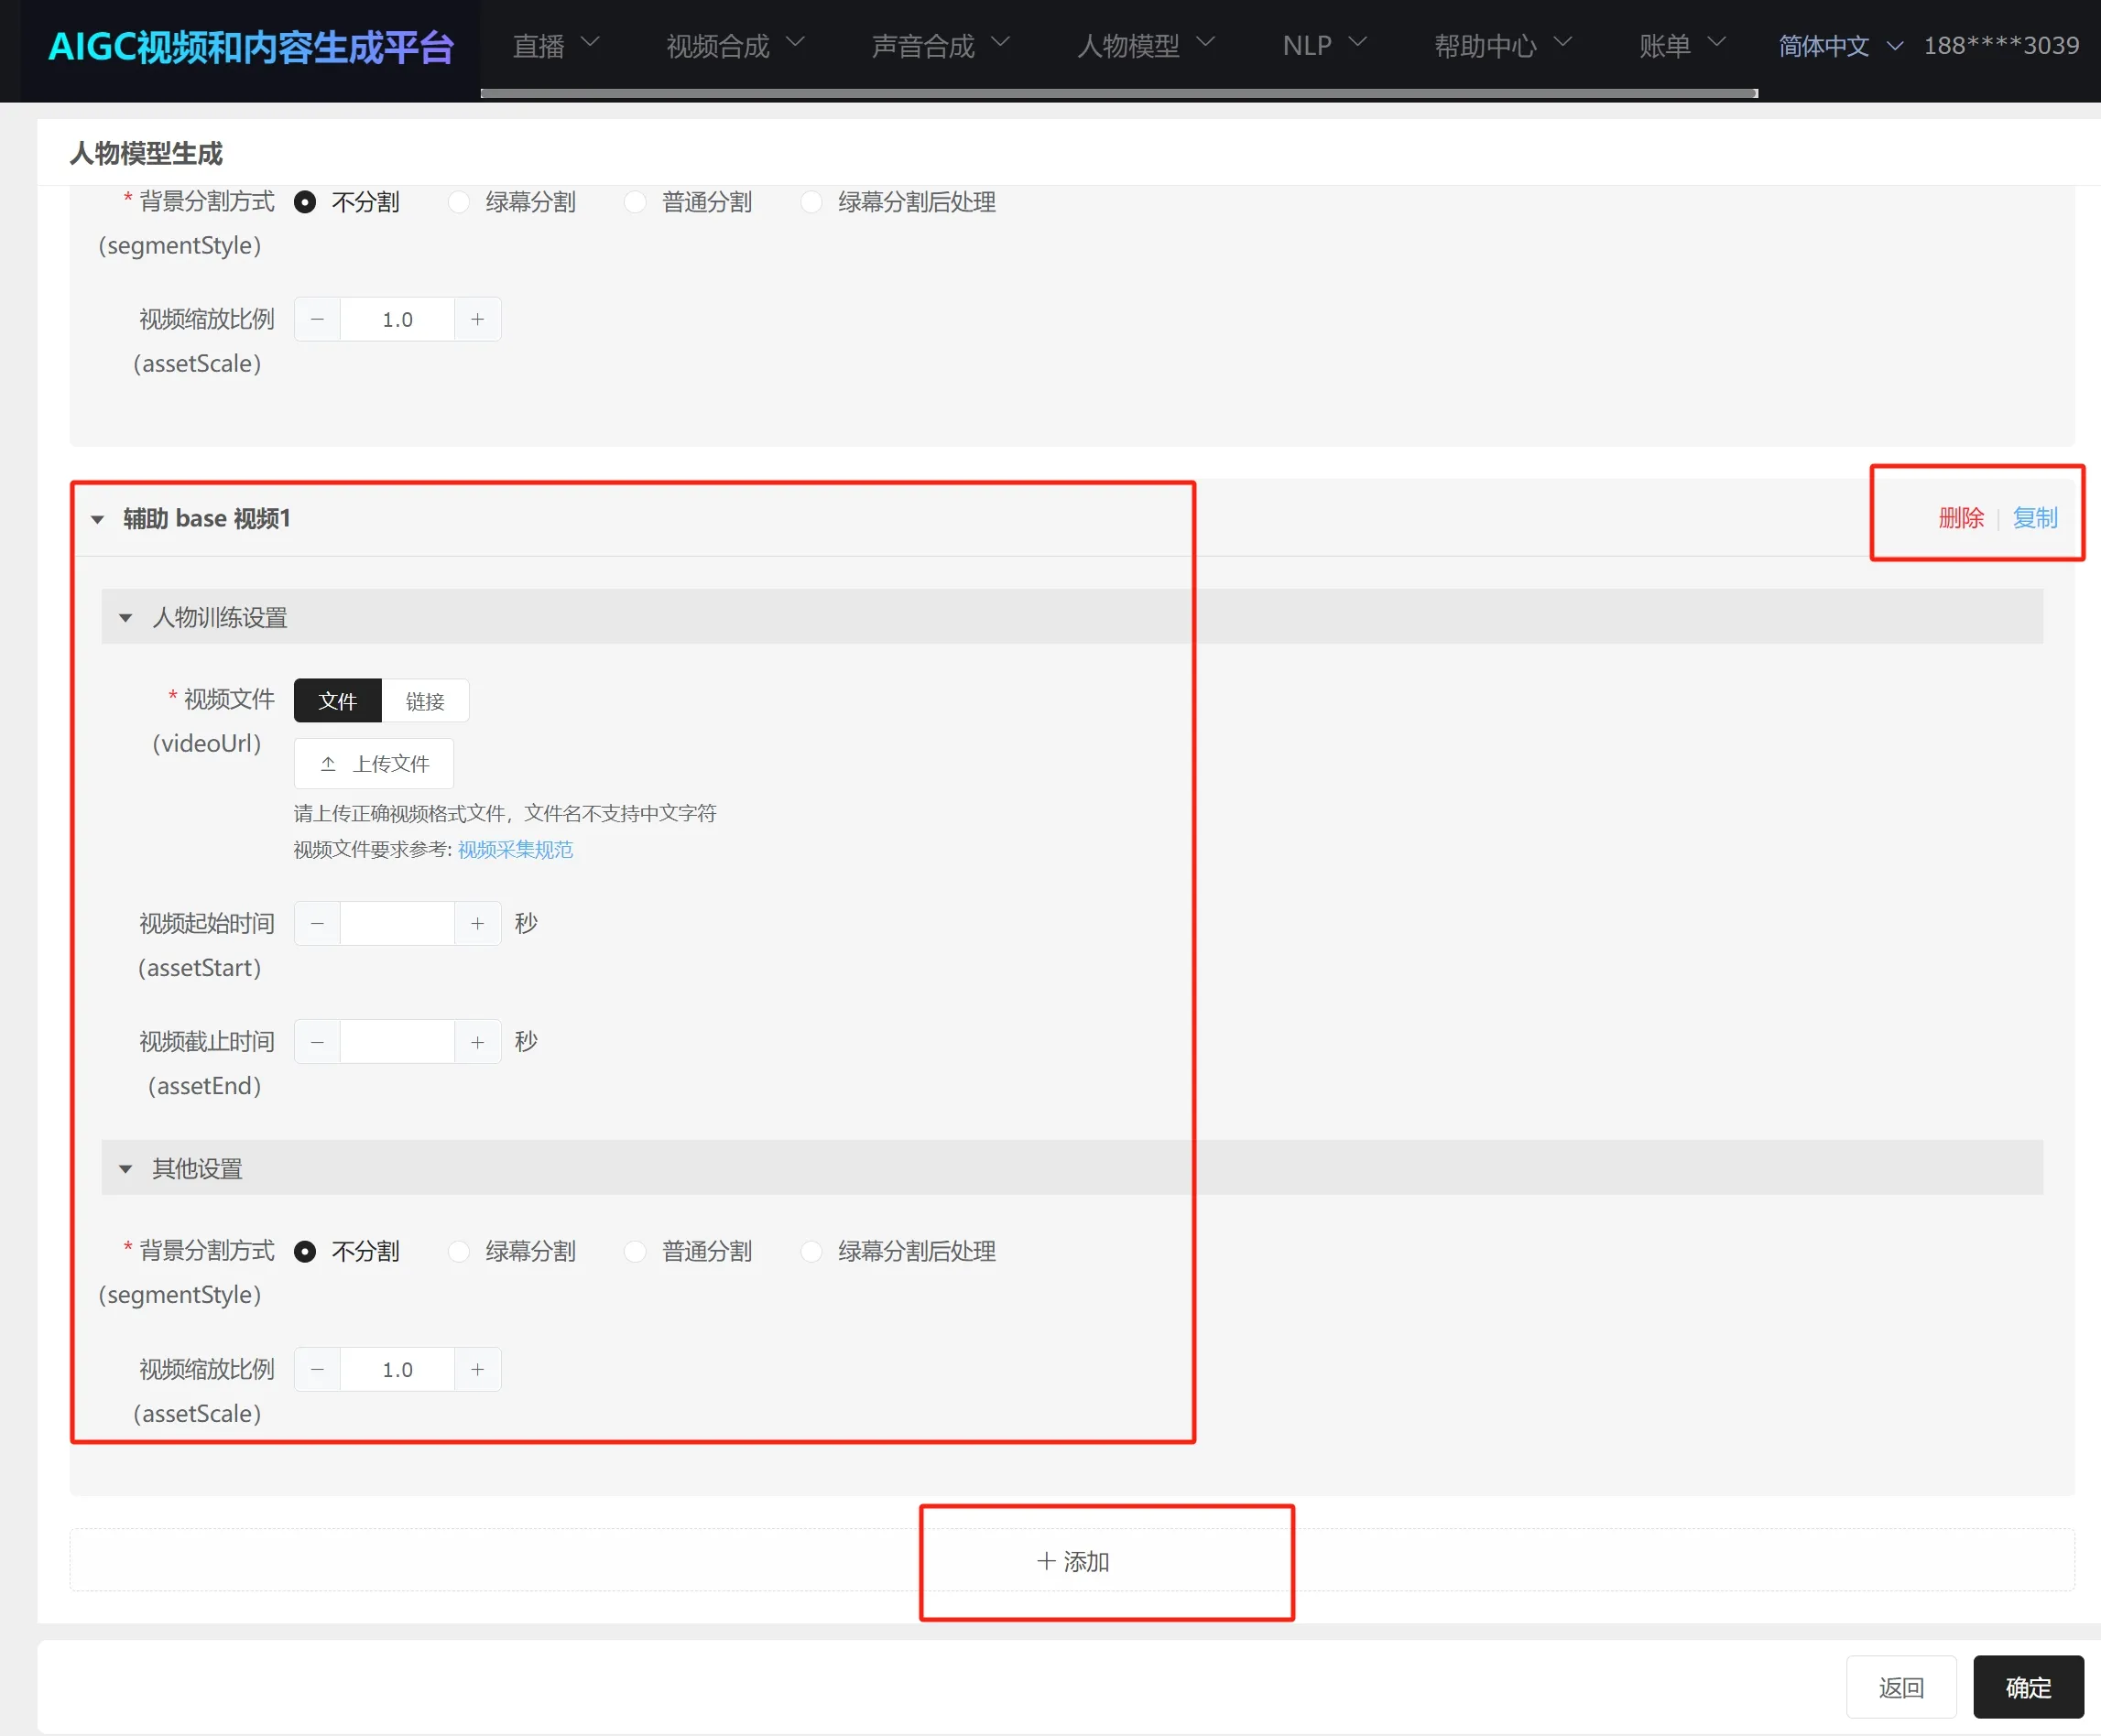
After submitting the task, multi-video training generally takes longer; the specific time depends on the number of videos.
Once the task is completed, you can see the finished task in "Avatar Model" → "Avatar Model Generation." Click "More" to view the generated avatar data information.
# 5.3 Parameter Details
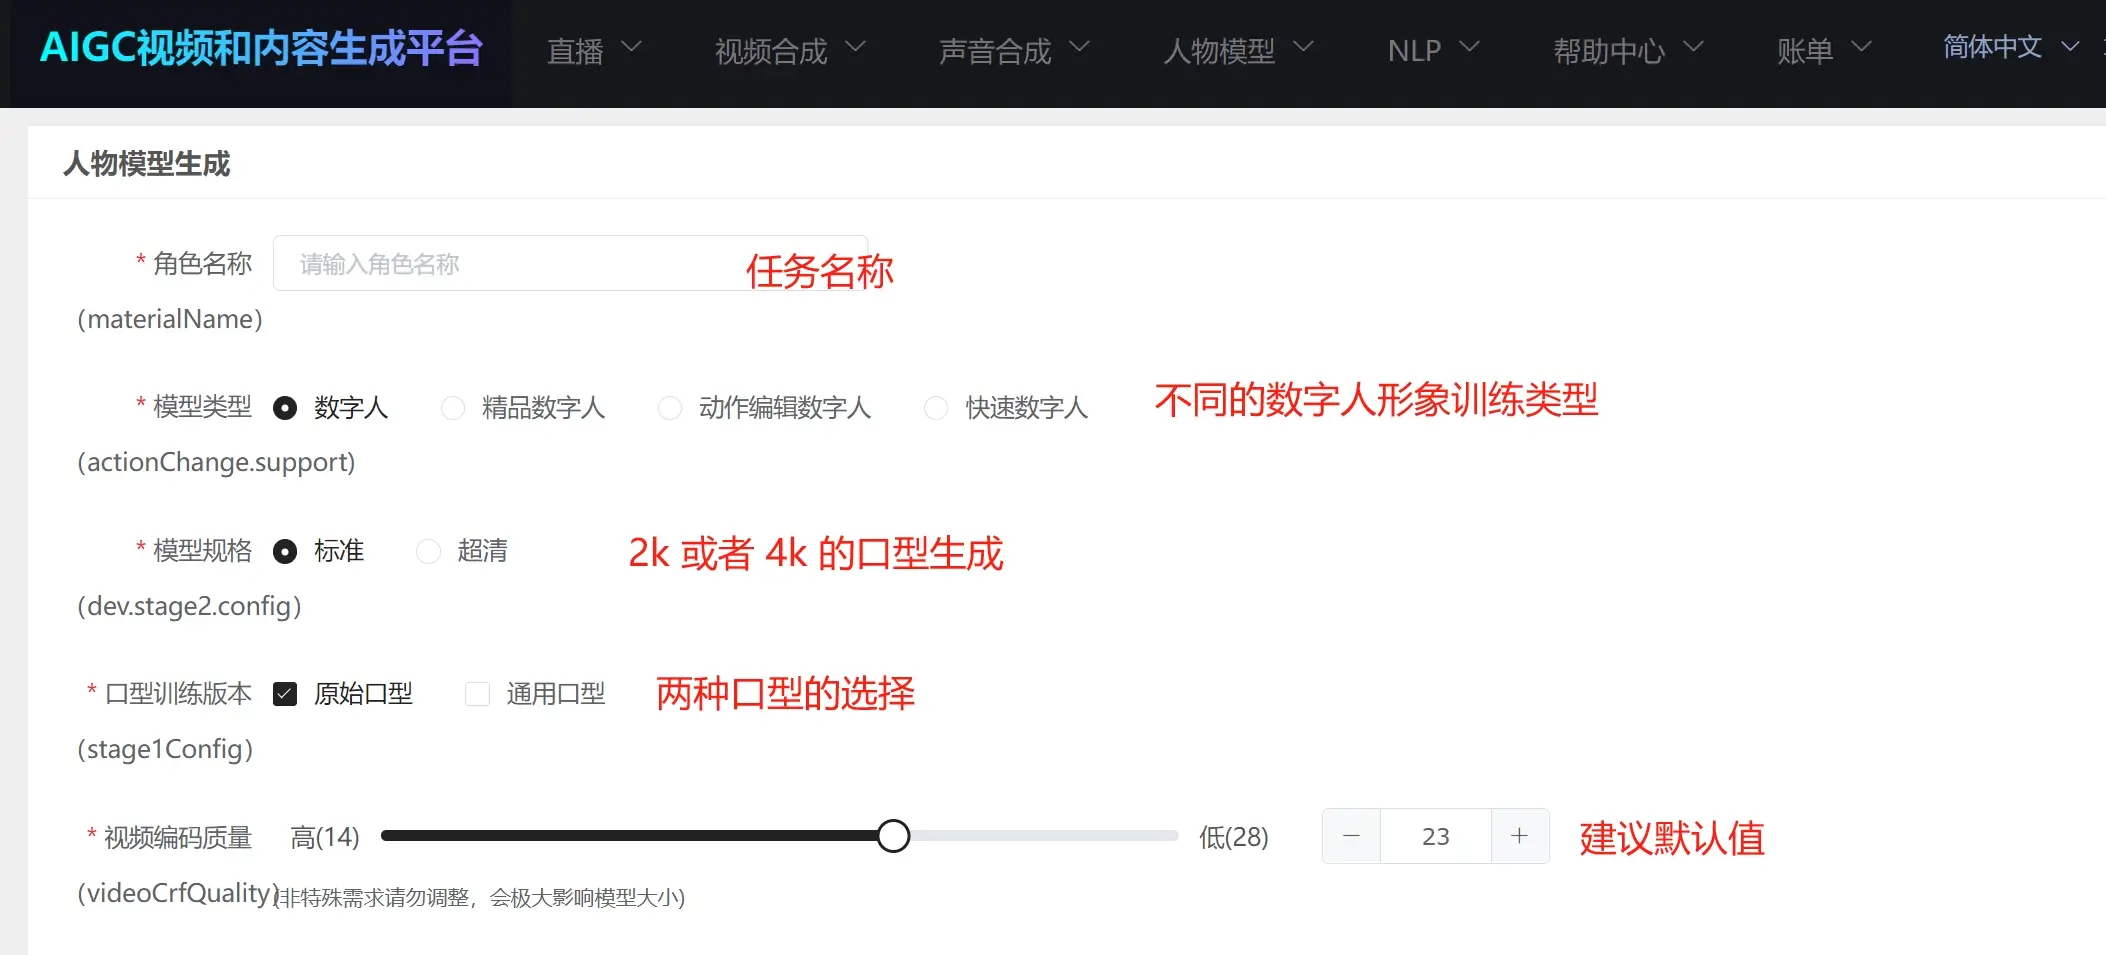
Character Name: The task name for the avatar generation.
Model Type:
Digital Human: Standard digital human avatar generation type; supports green screen segmentation, portrait segmentation, and no segmentation for training.
Premium Digital Human: Supports idle-state digital humans, primarily used in live streaming interaction, 1v1 Q&A, intelligent customer service, and similar scenarios. Must be recorded according to specific requirements for this type of training; otherwise, results may be unsatisfactory.
Motion-Editable Digital Human: Supports digital humans that can trigger specified actions (current version only supports video compositing scenarios; live streaming does not yet support digital humans with triggered actions). Must be recorded according to specific requirements for this type of training; otherwise, results may be unsatisfactory.
Quick Digital Human: Real-scene digital human type; cannot use green screen segmentation or portrait segmentation.
Specification Type: "Standard" means 2K clarity, "Ultra HD" means 4K clarity. Note: this refers to the clarity of lip generation, not the video clarity. Video clarity depends on the resolution of the original training video. Normally, if the original training video is 2K, select "Standard"; if 4K, select "Ultra HD." Note that selecting ultra HD will also extend the training duration.
Lip Training Version:
Original lip sync: Learns the lip movements from the video character and attempts to generate lip movements based on that person's lip patterns.
Universal lip sync: Attempts to generate lip movements using generally accepted methods. In most cases, universal lip sync produces better results than original lip sync. It is recommended to select both, with priority on universal lip sync.
Video Encoding Quality: Default values are recommended.
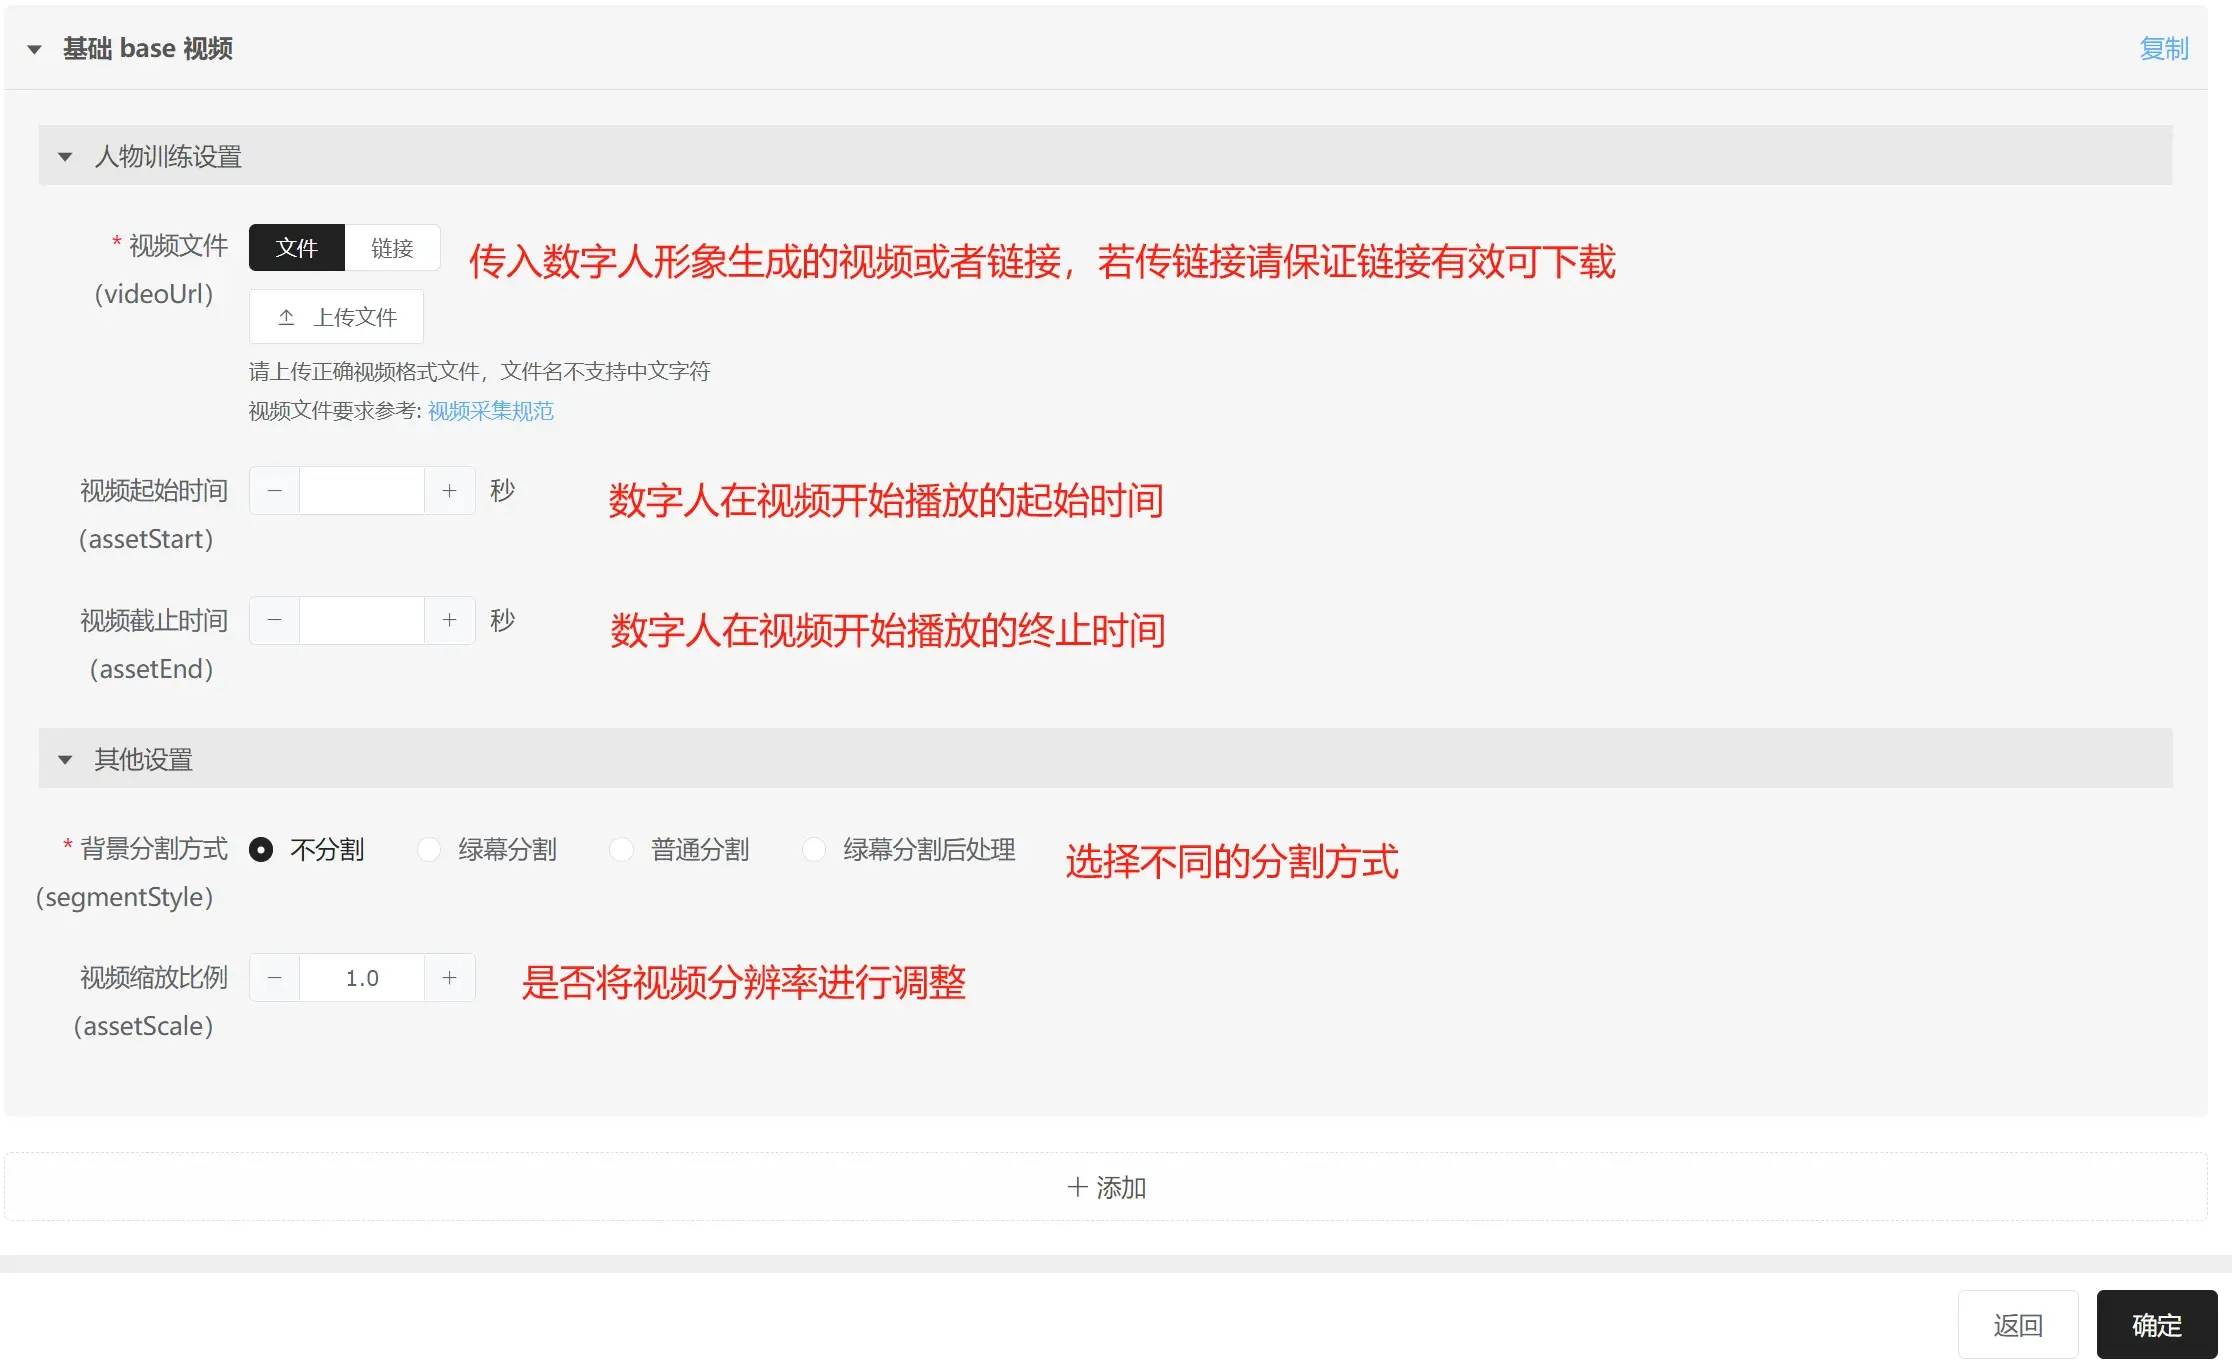
Video File: You can upload a local file or provide an OSS link. OSS links are recommended to prevent upload failures due to large file sizes.
Video Start Time: The start time when the digital human plays during video compositing or live streaming. (If left empty, the algorithm automatically detects the time when the character starts moving in the video.)
Video End Time: The end time when the digital human stops playing during video compositing or live streaming. (If left empty, the algorithm automatically uses the time point 5 minutes after the character starts moving as the end time.)
During digital human video compositing or live streaming, only the lip portion is generated based on text or audio. All other expressions, body movements are based on the original video playback. The playback starts from the "Video Start Time" set above and ends at the "Video End Time" set above. The playback logic is: play from the first frame of "Video Start Time" to the last frame of "Video End Time", then play in reverse from the last frame of "Video End Time" back to the first frame of "Video Start Time", and repeat this cycle.
Green Screen Segmentation Method:
No segmentation: No segmentation is used; training is based on the original video's character and background. Note: background images cannot be replaced in this scenario.
Green screen segmentation: Uses green screen segmentation for keying; the output digital human can have its background replaced.
The principle of green screen segmentation is green removal — removing the green portions of the video. Therefore, when using green screen segmentation, be careful to avoid any green color, green reflection, or green bleed-through; otherwise, the green will be incorrectly removed, resulting in segmentation errors.
- Portrait segmentation: Uses portrait segmentation for keying; the output digital human can have its background replaced.
The principle of portrait segmentation is extracting the character. Since the character may wear hats, have curly hair, wear jewelry, or have clothing colors similar to the background, the overall effect cannot be fully controlled. It is recommended to use portrait segmentation only when green screen segmentation is not available.
- Green screen post-processing segmentation: First generates the avatar and composites the video, then attempts green screen segmentation. In most cases, the standard "Green Screen Segmentation" above is sufficient. "Green Screen Post-Processing Segmentation" is suitable for cases where the face rotation angle is too large — performing green screen segmentation after lip generation produces better segmentation results in the lip area.
Video Scale Ratio: Adjusts the resolution of the original video. If the original video is 4K and the resulting avatar model zip package is too large, or if you want to use a 2K avatar in a live streaming scenario, you can adjust this parameter.
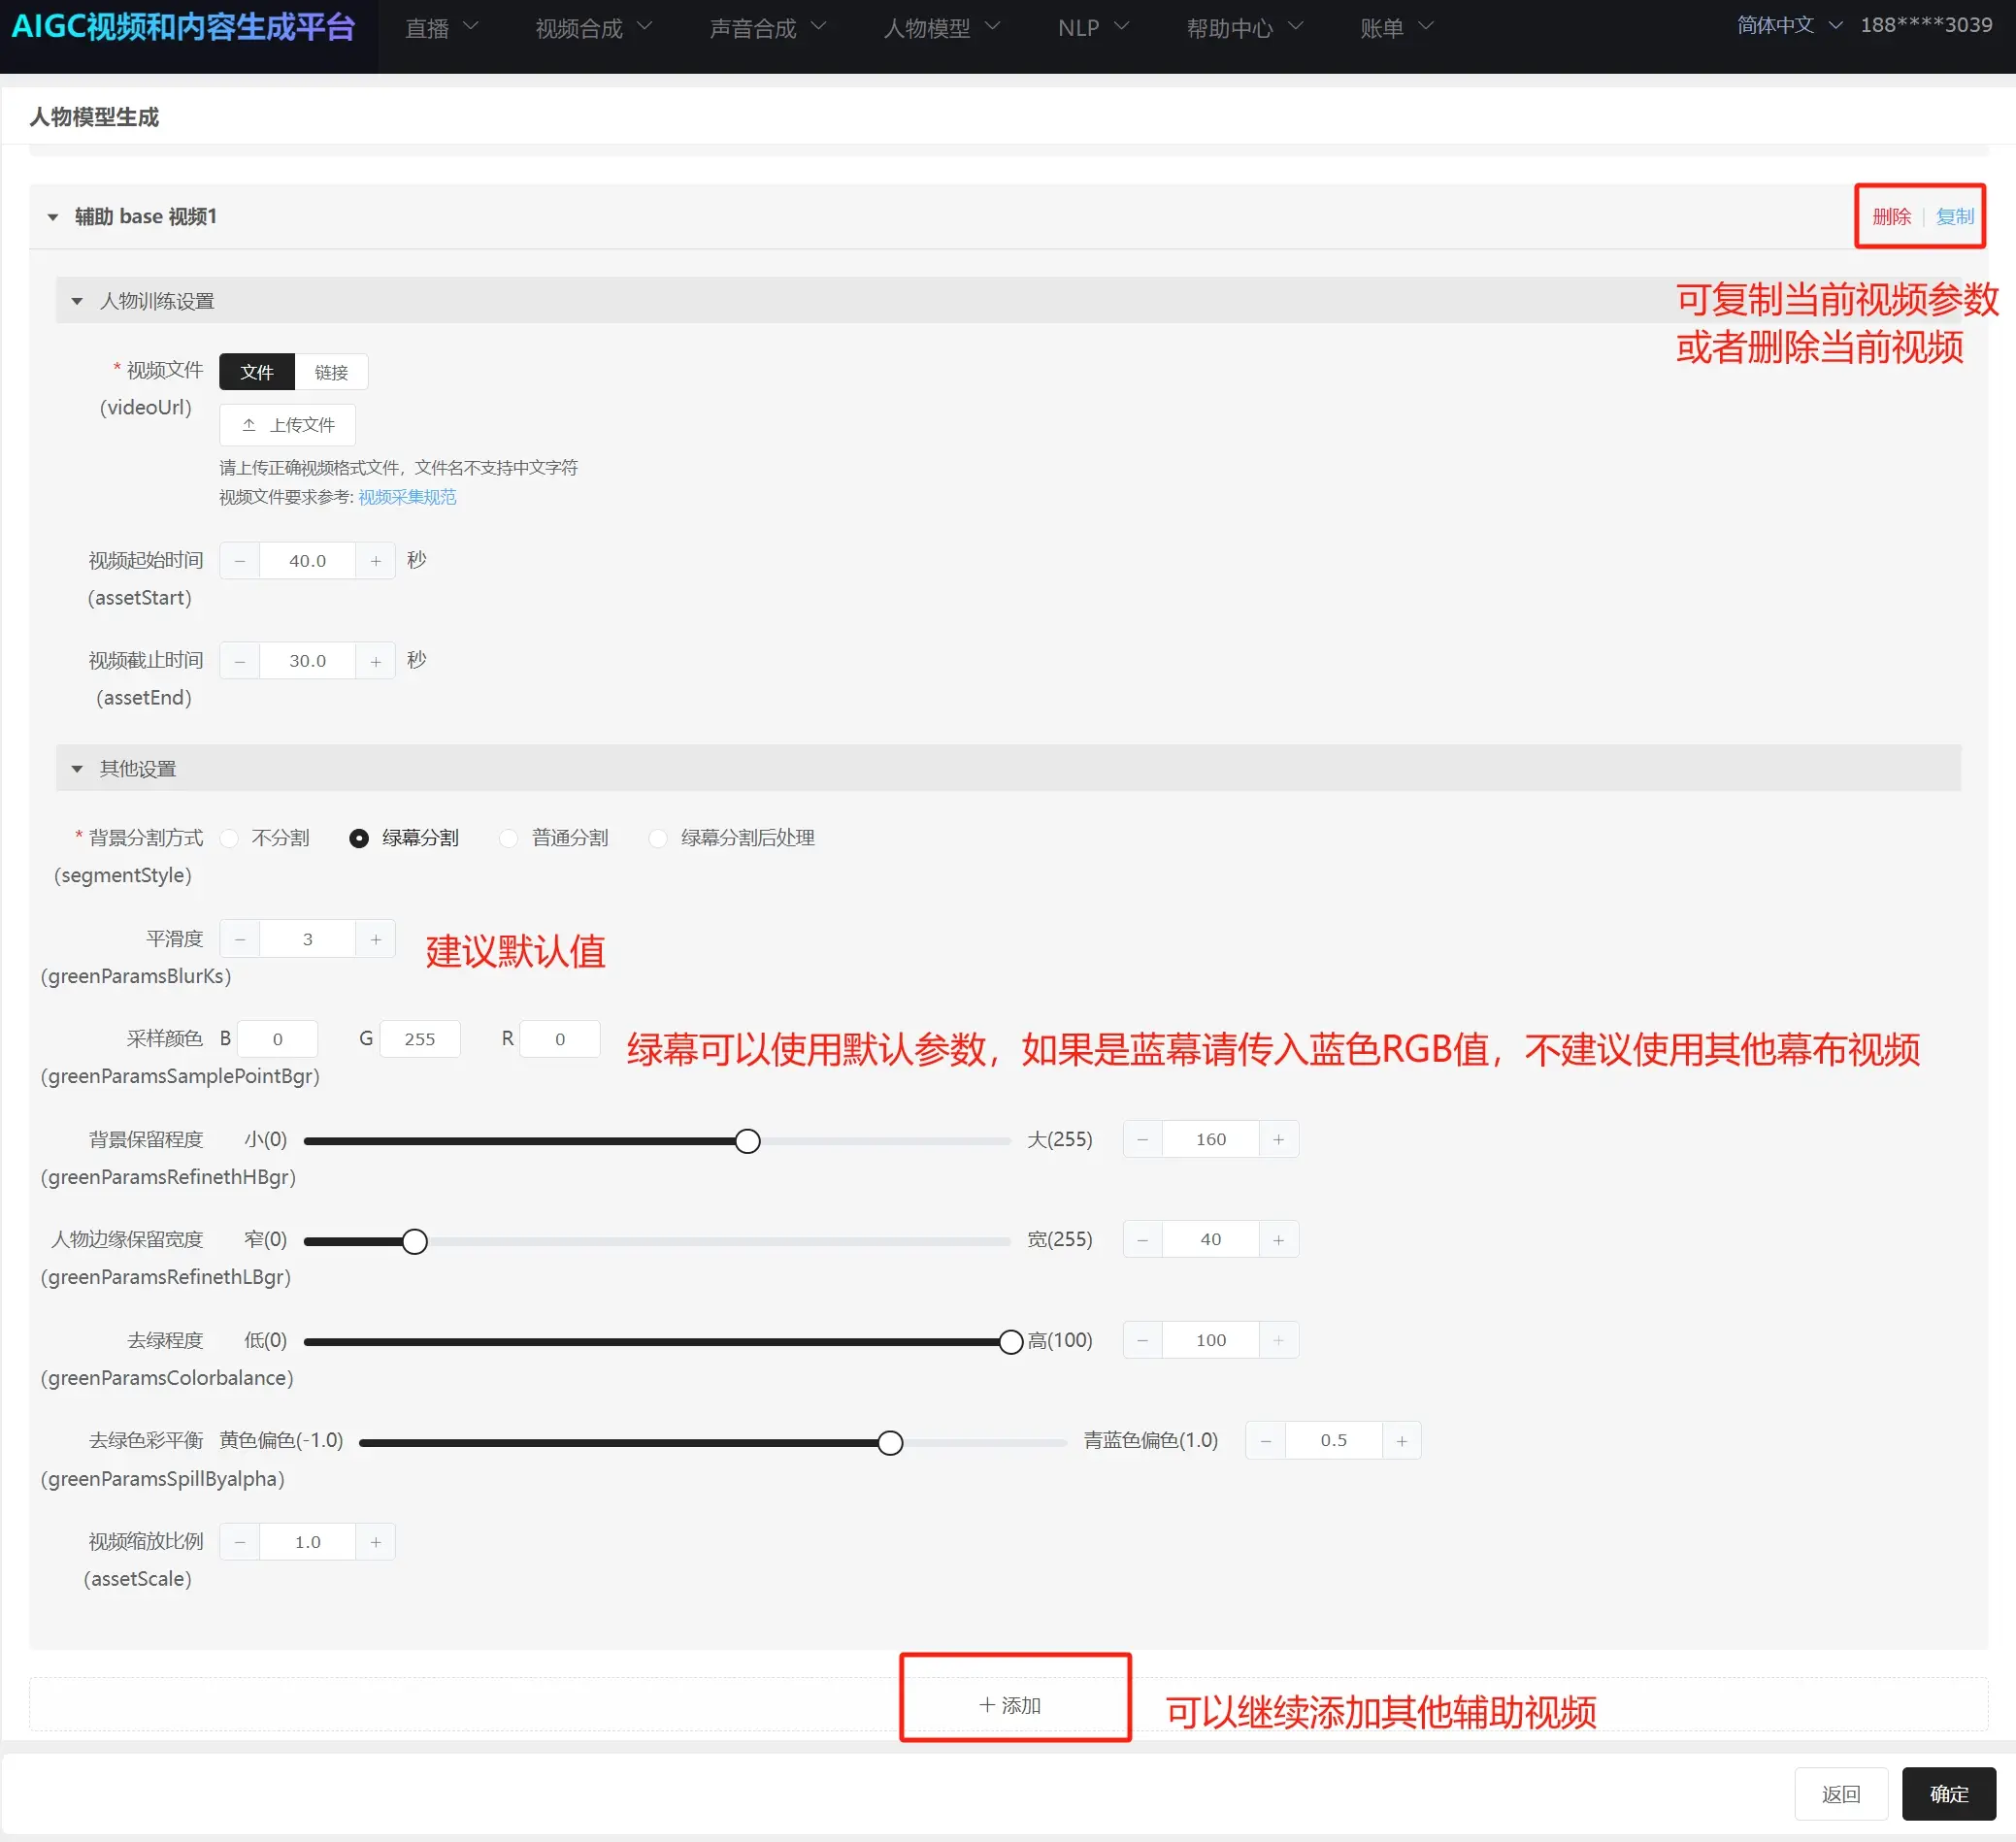
Green Screen Segmentation Parameters:
Smoothness: Default value is recommended.
Sampling Color: The color for green screen segmentation. Default is green; blue (RGB: 0,0,255) can also be used. Other colors are not recommended as results cannot be guaranteed.
Background Retention Level: The degree of keying. To increase green removal, set this value lower (145, 130, 120, 100, 80, 60, etc.; setting this value too low is not recommended as it will lose edge details).
Character Edge Retention Width: The degree of green removal at character edges. To increase green removal, set this value lower (30, 20, 10, etc.; setting this value too low is not recommended as it will lose edge details).
Green Removal Level: Default value is recommended. If there are yellow clothes or yellow elements, green screen segmentation may cause yellow color shift. Set this value to 1 to ensure yellow maintains its original color representation.
Green Screen Color Balance: Default value is recommended.
Premium Digital Human Parameters:
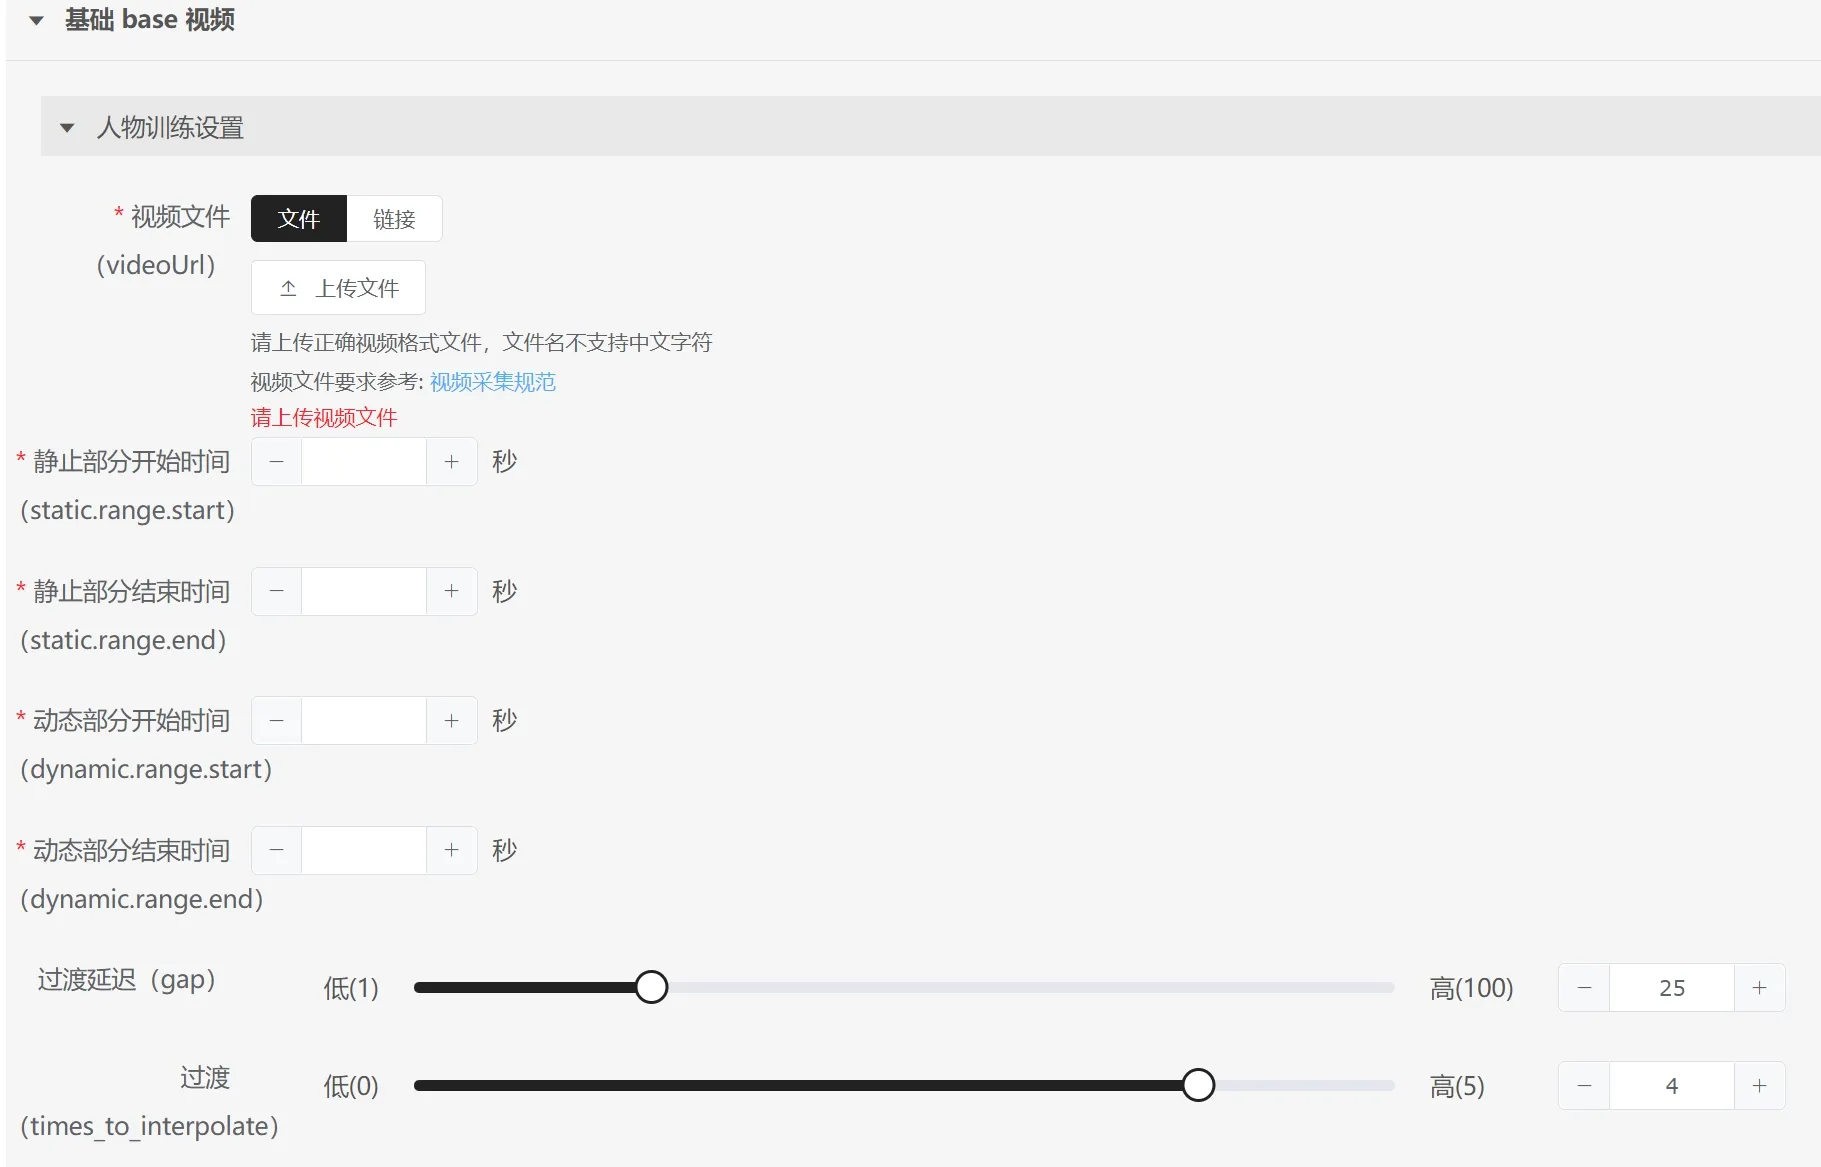
Static Portion Start Time: The start time of the silent state; generally, fill in the start time of the first 30-second silent portion.
Static Portion End Time: The end time of the silent state; generally, fill in the end time of the first 30-second silent portion.
Dynamic Portion Start Time: The time when the model begins to move.
Dynamic Portion End Time: The time when the model's last movement ends (you can select the end time of a movement near the end of the video).
Transition Delay: Default value is recommended.
Transition: Default value is recommended.
Motion-Editable Digital Human Parameters:
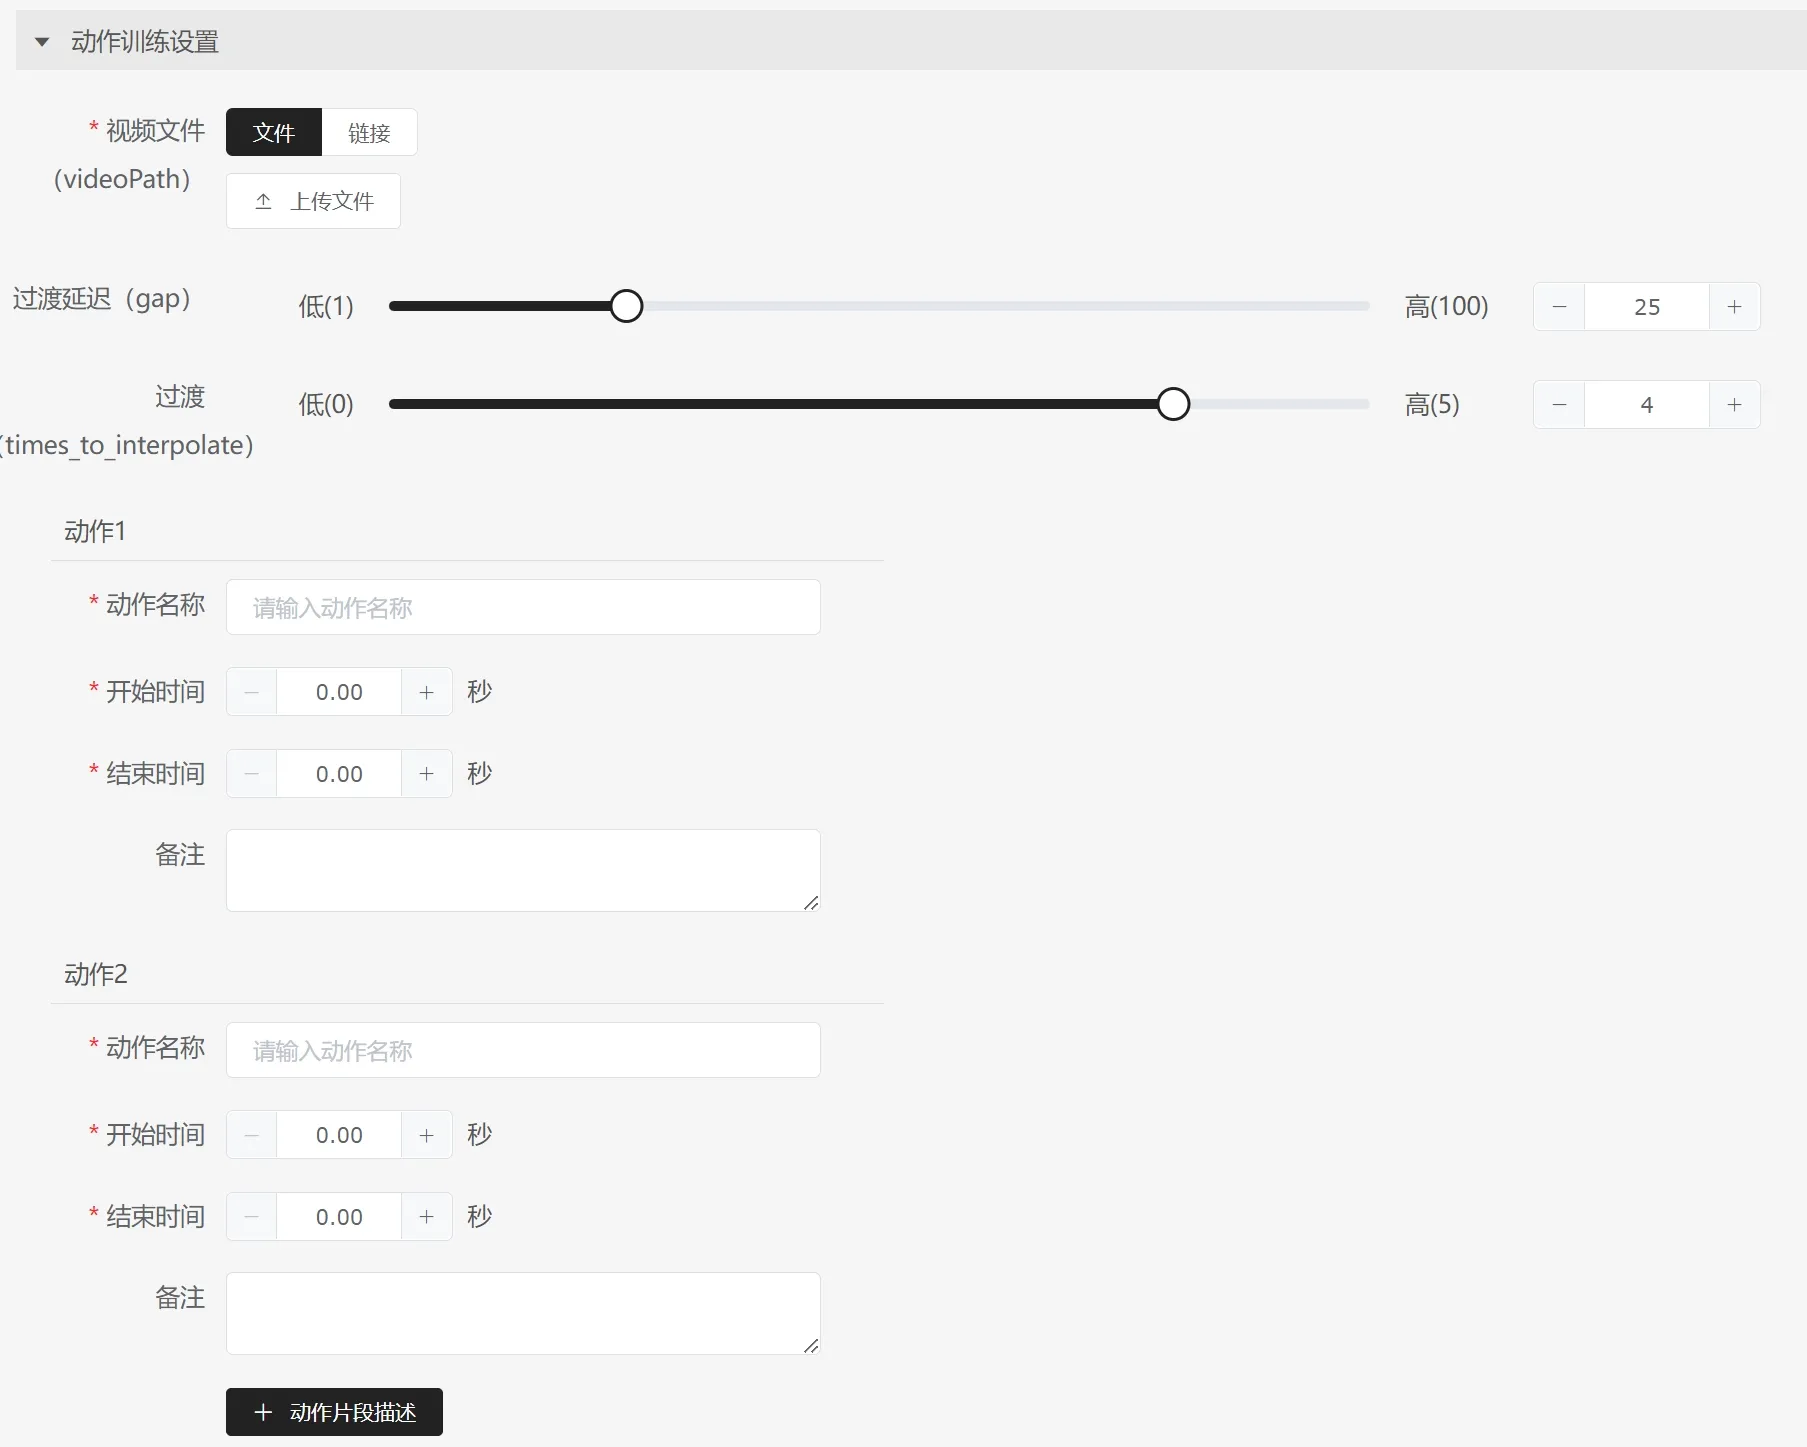
Transition Delay: Default value is recommended.
Transition: Default value is recommended.
Action 1: Action 1 must be the idle time segment. This time segment serves as the initial and terminal state for all subsequent actions. Choose a time segment that meets requirements carefully; a 30-second segment is recommended.
Action Name: The name for each action. For example, the first action is named "idle." Action 2 and subsequent actions should be named according to each action in the video.
Start Time: The start time of the current action.
End Time: The end time of the current action. Note: for better effect expression, it is best to be frame-accurate. For example, the 10th frame at 10 seconds would be 10.4 seconds (at 25fps, the 10th frame equals 0.4 seconds).
Notes: Optional.
# 6. Using the PAAS Platform to Update Digital Human Models
# 6.1 Usage Process
Log in to the platform with your PAAS account.
Click "Avatar Model" at the top → "Avatar Model Update." The current page shows all submitted update task statuses (limited to tasks within the last 7 days).
Click "Update Avatar Model" on the left to enter the task model update page.
Fill in the content that needs to be updated, and click "Confirm" in the lower right corner to submit the task.
After submitting the task, it is estimated to complete in 1–3 hours.
Once the task is completed, you can see the finished task in "Avatar Model" → "Update Avatar Model." Click "More" to view the generated avatar data information.
# 6.2 Notes:
The original model file and original video file must be a matched pair of generation data — meaning this model file must have been output from this original video file. Do not enter unrelated original video files and original model files.
The digital human's lip movement information will not be updated; the FFID information uses the FFID generated from the previous avatar training.
Model Type: When updating a digital human model, only same-type updates are allowed. For example, an original standard digital human type cannot be updated to a premium digital human or motion-editable digital human, and vice versa.
Video Start Time and Video End Time: Can be modified.
Background Segmentation Method: Only supports updates within the same background segmentation type. For example, if the previous type was green screen segmentation, it cannot be updated to portrait segmentation.
Background Segmentation Parameters: If the previous method was green screen or portrait segmentation, the corresponding parameters can be updated.
Video Scale Ratio: Can be updated to a different resolution. For example, if a 4K resolution digital human is needed for video compositing but the live streaming scenario currently only supports 1080P resolution for smooth performance, you can use avatar model update to set the video playback ratio to 0.5, which will output a 1080P resolution digital human model package.
# 7. Digital Human Collection Related Notes
# 7.1 Collection Video Format Requirements
- Format requirement is MP4; other formats cannot be used. Especially MOV format: If an iPhone-recorded MOV file has HDR enabled, since iOS's HDR is a closed-source algorithm, the MOV video colors cannot be fully restored. Please convert MOV to MP4 before submitting the avatar training task.
- 1080P is recommended; 4K is supported. Try to avoid using other resolutions, as standard resolutions are compatible with more use cases.
- FPS requirement is 25; if not 25, the FPS will be forcibly converted to 25fps.
- Portrait (vertical) recording is recommended; landscape is also supported (landscape training will output a landscape-format digital human by default).
# 7.2 Video Content Audio and Visual Requirements
- No external sounds should appear in the video, especially no second person's voice. Minimize noise from air conditioners, servers, and other equipment; avoid other site noise or environmental vibrations.
- For green screen recordings, ensure there is absolutely no reflective situation; such as silver jewelry, glossy eyeglass frames, glossy belts, etc.
- Pay attention to lighting — do not allow green reflection on the model's body or non-green objects. Green reflection will significantly affect green screen segmentation quality; detailed guidance on improving green screen effects will be provided later.
- No dynamic backgrounds (videos, animations, etc.); no reflective, transparent, or semi-transparent background materials. No direct light sources in the recording background, such as windows or illuminated light bulbs.
# 7.3 Video Silent State and Narration State Check
- Silent footage: The first 30 seconds of the entire collection process are for silent footage capture. The model faces the camera and keeps their mouth closed (simulating a listening posture, with natural and appropriate slight nods and smiles allowed, but not too many; lips must remain closed throughout the 30-second silent segment).
- Narration footage: After recording 30 seconds of silent footage, maintain the same lighting environment and model pose, then proceed to the narration footage collection phase.
- During the narration footage collection phase, the narration script content, model's speaking pace, emotions, expressions, and gestures should closely simulate the typical scenarios where the digital human will be applied (for example, if the digital human will primarily be used for travel product live streaming sales, use the actual travel product live streaming script and match the speaking pace, emotions, expressions, and gestures of a live streaming seller, simulating the real-world usage scenario as closely as possible).
# 7.4 Potential Failure Points in Avatar Training Tasks
Missing face: Ensure every frame has a visible face; hands or objects must not obstruct the face or lips.
Multiple faces: Ensure no frame contains two faces (for example, a face on a poster entering the frame may cause failure).
Large-angle face: Face angles should be within 30°. Large angles (45° or more) are supported for recognition but have a certain probability of failure. Large-angle walking example video (opens new window)
Non-consecutive frames: Non-consecutive frames with faces in every frame will not cause failure, but the trained result will exhibit frame skipping. If non-consecutive frames have missing faces, the task will fail.
Additional video requirements:
- The model can wear makeup during recording; the output digital human will also have the makeup effect. Of course, our post-production beauty effects can also be used.
- Overly loose hairstyles may affect green screen segmentation quality (ignore this if not using green screen).
- Avoid dangling earrings or other hanging accessories, as they may cause reflections.
- Avoid hairstyles or oversized glasses obstructing the model's lower face. The digital human only generates lip movements; eyeglass frames near the lip area may cause lip generation errors.
- Avoid highly reflective lip gloss or eye shadow as they may affect green screen segmentation quality and lip generation quality.
# 8. RuYing Voice Cloning Collection Standards
Dear customer, to help you obtain high-quality recording files, we have prepared a recording guide for you. Please follow the steps below for recording to achieve the best TTS voice cloning results.
# 8.1 Environment Preparation
- Please record in a quiet small room (away from traffic noise, crowd noise, and other sources of interference). A recording studio is the best choice. Avoid recording outdoors, in open offices, or in locations with obvious noise or echo.
- Ensure that only one person speaks during the recording process; avoid capturing other people's voices.
# 8.2 Equipment Preparation
- We recommend using a high-quality microphone, such as products from Sennheiser, AKG, or similar brands. You may also use a newer headset with a conference microphone. If conditions are limited, using the built-in microphone of a newer iPhone is acceptable, but please avoid using AirPods or other Bluetooth earphones.
- During recording, ensure you are always within the microphone's recommended pickup range and maintain a consistent distance as much as possible.
# 8.3 Pronunciation Requirements
- Do not read the same document repeatedly; read the script only once.
- Maintain a consistent speaking pace, tone, and emotional state throughout the recording. Pronunciation should be accurate and clear, with the voice tone and pitch matching the desired cloned voice.
- Keep volume moderate; avoid plosives and noise from being too close to the microphone, and avoid being too far away resulting in low volume.
- Avoid breathing sounds, inhaling sounds, and meaningless filler words like "um" or "ah" at the beginning, end, or middle of sentences; avoid background noise.
- Audio format should be lossless if possible.
- Noise reduction is essential; ensure the audio has no environmental noise (otherwise, the cloned voice will have noise artifacts).
# 8.4 Voice Cloning Notes
- It is recommended to record at least 20 minutes of effective audio; 30 minutes is recommended. Longer recordings will provide better voice cloning fidelity.
- For longer recordings, you can record in segments with breaks in between, but all recorded audio must maintain consistent speaking pace, volume, pitch, and tone.
- A voice authorization audio file is required; file requirements are detailed in the appendix.
- For large model voice cloning, it is recommended to record 50–90 seconds of effective audio.
# 8.5 Format Requirements
- Voice cloning audio files and authorization audio file formats supported: wav, mp3, m4a, mp4, mov, aac.
# 8.6 Appendix
The user authorization audio file is primarily used to confirm that the user has authorized us to perform voice cloning. The audio content must be recorded according to the specified script.
- Chinese example:
xx (speaker's name) confirms that my voice will be used by xx (company name) to create a synthetic version of my voice.
The authorization file supports other languages, as follows:
- English:
I [state your first and last name] am aware that recordings of my voice will be used by [state the name of the company] to create and use a synthetic version of my voice.
- Japanese:
私(姓名を記入)は自身の音声を(会社名を記入)が使用し、合成音声を作り使用されることに同意します。
- Korean:
나는 [본인의 이름을 말씀하세요] 내 목소리의 녹음을 이용해 합성 버전을 만들어 사용된다는 것을 [회사 이름을 말씀하세요]알고 있습니다.
# 9. Using the PAAS Platform for Voice Cloning
- Log in to the platform with your PAAS account.
- Click "Voice Synthesis" at the top → "TTS Personal Voice Model Generation - Qid (Recommended)" → "Click to Generate."

- Fill in the task information and upload the corresponding audio files.

- Click "Confirm" to create the voice cloning task.

- Once the task is completed, click "More" to download the result file.

- The result file contains the corresponding voice qid and other information. Please save it for use in requests.
Using TTS6 output as an example, the result file looks like this:
{
    "msg": "task is finished",
    "stage": "deployment",
    "voice": {
        "qid": "eQz_IP:AEAyxxxxxxxxRSUpItdQ0szE10LCzSU3QtDS0tjVLMDMK",
        "name": "-tts6",
        "gender": 1,
        "languages": [
            "en-US",
            "zh-CN",
            "af-ZA",
            "am-ET",
            "de-AT",
            "de-CH",
            "de-DE",
            "el-GR",
            "en-AU",
            "en-CA",
            "en-GB",
            "en-IE",
            "en-IN",
            "fr-BE",
            "zh-HK",
            "zh-TW",
            "zu-ZA"
        ]
    },
    "taskId": "tts6-051370ad-96cd-43a4-8a42-8fcdfa8658e6",
    "tenant": "116",
    "modelUrl": "",
    "taskType": "TTS6",
    "taskStatus": 5,
    "stageStatus": 5,
    "updatedTime": "2024-06-25T13:11:10.000194872Z",
    "sampleAudioUrl": ""
}
# 10. RuYing Voice Cloning Related Notes
- TTS3 voice cloning takes approximately 20 hours.
- TTS6 voice cloning is estimated to take less than 1 hour.
- Please ensure the voice cloning audio recording duration meets the corresponding requirements: TTS3 requires at least 20 minutes, with 30 minutes recommended; TTS6 recommends 1 minute, not exceeding 90 seconds.
- The authorization audio must strictly follow the corresponding script for pronunciation and must be from the same person as the voice cloning audio.
- All voice recordings require noise reduction. Environmental noise in the cloned TTS will result in significant differences from the original voice.
- TTS3 only clones Chinese voice; TTS6 can clone Chinese, English, and other multilingual voices, but voice fidelity is not as high as TTS3.